Robotics: How to Get Started — Part 3
By John Blankenship View In Digital Edition
Programming Algorithms
The last installment of this series explored why programming skills are so important for robot builders. It used several robot-related examples to introduce some basic programming principles. This installment explores the process of developing a complete program that can direct a robot to achieve a specific goal.
In order to program a robot to perform some task, you first need an idea or plan for accomplishing the desired goal. Such a plan is called an algorithm. It’s often advantageous to develop the algorithm in stages. Let’s use an example to help demonstrate how this can be done.
The Goal
For our example, the robot’s objective will be to find some specified object. We’ll assume our robot and the object to be found are both located randomly in a cluttered environment. Cluttered, in this case, simply means that there are objects in the environment that can potentially block the robot’s movements, as well as its ability to always see the object it’s trying to find.
If you aren’t experienced at programming a robot, writing a program to accomplish the above goal probably sounds extremely difficult. The secret to developing a complex algorithm is to break it down into smaller and smaller parts. Since this article is really about the process of developing the algorithm, the program will be developed in stages. We’ll develop this program using RobotBASIC as mentioned in Part 2 of this series. RobotBASIC is a free language available from www.RobotBASIC.org. A major advantage of RobotBASIC is that it includes a free robot simulator that allows you to create artificial environments for the robot to pursue its tasks. If the desired environment is not trivial, then it might be necessary to develop an algorithm just for creating the environment.
The point is that you need to have an algorithm before attempting to program any complex situation. Breaking that algorithm into smaller parts makes each new part less complex and thus more manageable than the whole.
Defining Our General Needs
Hopefully, it’s becoming clear that even before we get into developing the algorithm for our find-the-object portion of our program, we need to create an on-screen environment. We also need to place our robot and the object we want it to find somewhere inside that environment.
Some of these processes may be complex enough that we’ll need to analyze them further before trying to program them. At this point though, we have established four tasks that our program needs to do. If we don’t worry about how we’re going to accomplish each of those tasks — at least for now — then we can actually write a program that shows a first-level organizational plan for accomplishing our goal of finding a specified object in a cluttered environment.
Figure 1 shows a main program that meets our needs.
main:
gosub DrawEnvironment
gosub CreateRobot
gosub CreateGoal
gosub FindGoal
end
FIGURE 1.
The algorithm used was so simple that even beginning programmers probably wouldn’t need much planning before writing the program. Each of the four lines that actually perform work in this program do so by calling modules called subroutines. The module called DrawEnvironment, for example, takes care of all the details needed to produce an appropriate environment.
What is important is that when writing this program, we don’t need to worry about any of the details of any of the modules being called. We only needed to decide what things need to be done and in what order they should be performed.
Now that you see it written as a program, you might feel what we’ve done is pretty simple and straightforward.
Getting Into the Details
Now that we’ve divided the major goal into four smaller tasks, we can look at each one individually to determine how to solve the problems. At first glance, this might seem trivial, but upon further inspection, we can see that the tasks interact with each other.
For example, we can’t just place the robot on the screen anywhere we want because it shouldn’t conflict with the placement of objects in the environment. Placing the goal also requires some thought, as it should not be placed too close to the robot’s initial position as well as not conflicting with objects.
There are many ways to solve such problems, some of which can become complicated — especially for a beginning programmer. For example, we could just place the robot anywhere we want and then make sure that the objects we place in the environment don’t overlap with the robot. Avoiding such an overlap can be more difficult than you imagine. We can’t, for example, just not create objects at the same X,Y position as the robot because we have to consider the overall size of both the robot and the objects.
For that matter, we also need to decide if it’s okay to have the objects themselves overlap with each other. A general overlapping might not be a bad thing because it could just create a larger, irregular shaped object. However, if enough objects overlap or get too close to each other, it might be possible to create a wall of sorts that could enclose the robot and prevent its ability to find the goal.
Figure 2 shows how this might happen. Notice that the two objects (red and blue) prevent the robot from reaching the goal even though they do not overlap.
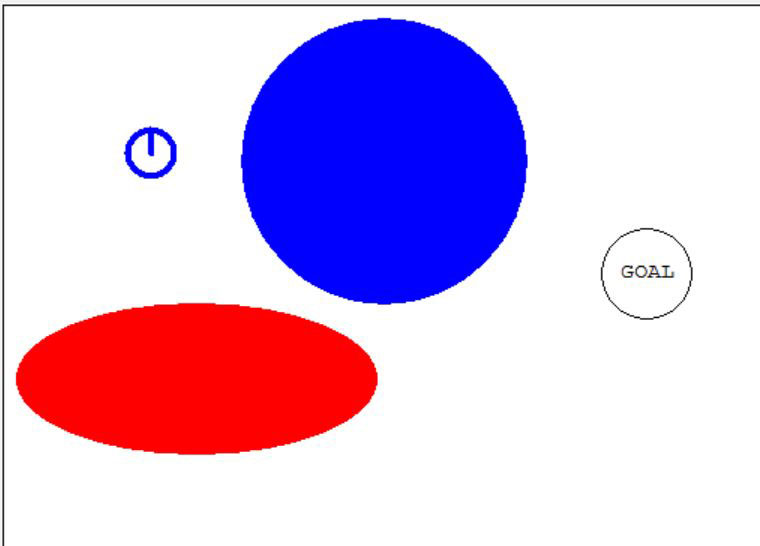
FIGURE 2.
Clearly, we can’t place the objects or the robot and the goal just anywhere in the environment. What we need is some kind of plan (algorithm) that clearly defines how to build an environment. It’s important to realize that there are many ways to accomplish this task and there is no reason to believe that any of the possible ways are absolutely better than the others. Some methods might be more eloquent perhaps and some may make programming easier, but each option will have various types of advantages and disadvantages that should be considered, based on what is important for the current situation.
Since this is a project designed to help beginning programmers learn how to devise strategic algorithms for implementing their goals, let’s assume the most important aspects of our desired algorithm is that it’s easy to understand and program.
After considering several potential solutions, I came up with a simple idea that met the desired criteria (that it was easy to understand and program). Remember, this is not the only solution and there could certainly be others that are better in some way. Of course, if you’re new to programming, you may not always know what ideas are easy to program, but that is what practice is for.
The Plan
Figure 3 shows the basic idea. The larger rectangle in the figure represents the simulated environment. Inside the environment, there are three more rectangles of different colors. If we place the robot somewhere inside the blue rectangle, the goal inside the green rectangle, and some objects inside the red rectangle, we have made our overall task of organizing the environment much easier, even though we still have some details to consider.
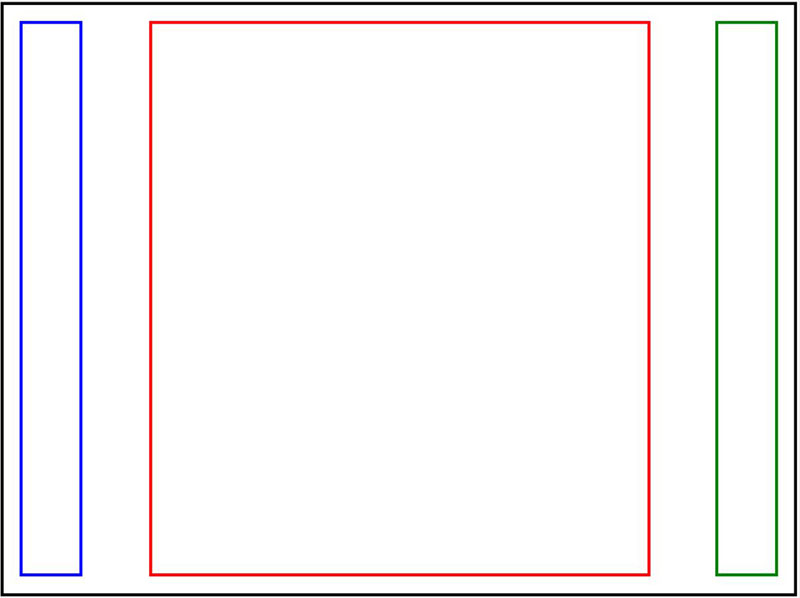
FIGURE 3.
For example, we have to make sure the robot and the goal fit inside their respective areas regardless of their size, and we need to make sure that the objects placed inside the red rectangle don’t overlap in ways that prevent the robot from reaching the goal. It’s also important that the environment we create be different each time we run the program in order to make finding the goal a true challenge.
While there are certainly other restrictions we’ll eventually have to consider, we now can consider each of the three tasks independently (creating the robot, the goal, and the objects), and that makes each task much easier than the whole. Let’s prove that by building the subroutine that positions the robot on the screen.
Placing the Robot
Figure 4 shows a subroutine that creates the simulated robot and positions it along the left side of the screen, analogous to being inside the blue box.
CreateRobot:
rLocate 30,30+random(540),90
rInvisible GREEN,LIGHTBLUE
rPen DOWN
return
FIGURE 4.
The initial X position for the robot will always be 30 and the Y position will be between 30 and 570. These values were used because they ensure that the robot will be positioned without conflict on the left side of the screen. The subroutine also lowers a pen on the robot so that it will leave a trail as it moves. This way, we’ll have a record of its movements when it searches for the goal.
Placing the Goal
The goal can be positioned within the green box of Figure 3 using the same principles we used to position the robot. Since the goal will need to be seen by the robot, we’ll make it a unique color. I chose red. As we will see later, we also need a way for the robot to know when it has reached the goal, so we will surround the red circle with a light blue one (this will be discussed in more detail later). Figure 5 shows how the goal can be created.
CreateGoal:
Ygoal = 100+random(400)
SetColor LightBlue,LightBlue
call MyCircle(750,Ygoal,40)
SetColor Red,Red
call MyCircle(750,Ygoal,20)
return
FIGURE 5.
Creating the Environment
As mentioned earlier, drawing obstacles in the environment is not as easy as you might think because we have to make sure that objects aren’t randomly placed in a manner that will make it impossible for robot to reach the goal.
One simple algorithm would be to just draw equally spaced objects throughout the space that separates the robot from the goal. This can be accomplished with two FOR loops as shown in Figure 6, which draws circles with a diameter of 50 pixels, spaced 200 pixels apart throughout the desired area.
for x=200 to 600 step 200
for y=100 to 500 step 200
call MyCircle(x,y,50)
next
next
FIGURE 6.
Figure 7 shows these circles, as well as the randomly positioned robot and goal.
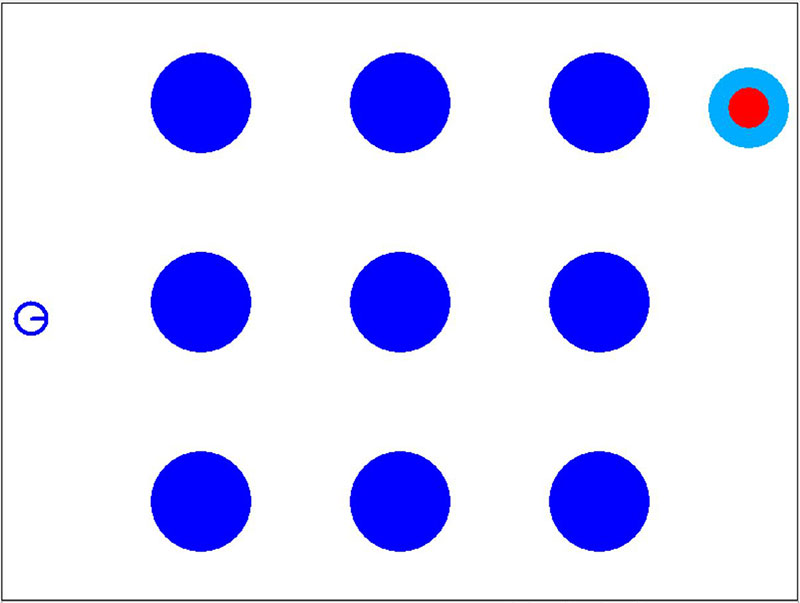
FIGURE 7.
If you examine Figure 7, it’s quickly obvious that the algorithm we used created a very symmetrically organized array of obstacles that can’t interfere with the robot, the goal, or each other. While this certainly addresses the problem stated earlier, it would be much nicer if the robot had to deal with a more randomly organized environment. Before you read further, try to think how you would modify the algorithm to produce a better environment.
Improving the Algorithm
There are various ways to easily randomize the obstacles in Figure 7. We could, for example, make each object a random size; perhaps with a radius between 20 and 50. We could also position the center of each obstacle slightly away from its current position; perhaps up to ±25 pixels both vertically and horizontally.
Finally, what if each of the nine objects were only created perhaps 70% of the time. These types of randomizations will be the basis for our algorithm.
These changes together will certainly produce a much more diverse environment as shown in Figure 8.
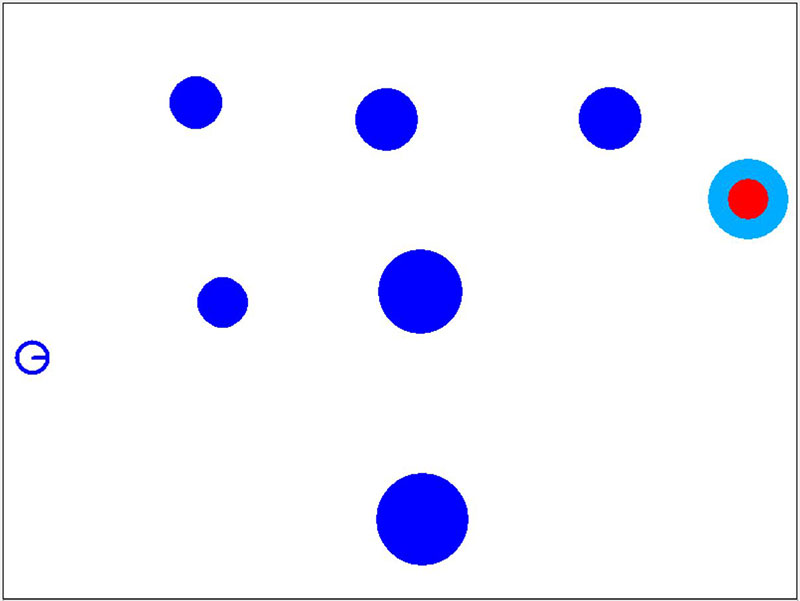
FIGURE 8.
In this case, there are only six obstacles (three were not produced) and they are of different sizes and slightly different positions when compared to Figure 7. Coupling this with randomly positioning the robot and goal ensures that the robot will have a very different environment to navigate each time the program is executed.
The code to produce the new obstacles is shown in Figure 9. You can certainly fine-tune this algorithm by adjusting the parameters in the code to change the maximum amount of change allowed for each object. This would be a great exercise in programming — especially if you’re just starting out in robotics.
DrawEnvironment:
clearscr
rectangle 0,0,799,599,black
setcolor Blue,Blue
for x=200 to 600 step 200
for y=100 to 500 step 200
if random(100)<70 then call MyCircle(x-25+
random(50),y-25+random(50),20+random(30))
next
next
return
FIGURE 9.
Finding the Goal
Now that we have an environment for our robot to perform in, we’re ready to develop an algorithm that lets the robot find the goal. This will be more complex (and hopefully more exciting) than the algorithms we explored in this article. If you understood what we did here though, you should be ready for the next step.
Unfortunately, we have run out of space so the find-goal algorithm will be developed next time. Don’t miss it! SV
Article Comments