How Design Revisions Can Make Your Combat Bot More Competitive
By Colin Lesco View In Digital Edition
Coming up with a competitive and successful robot design can be incredibly difficult to get right on your first try, and winning at your bot’s first ever combat robotics competition is a dream most of us won’t achieve. Most designs — especially from rookie builders — need a few competitions to reveal design flaws that then should be fixed with a redesign. Doing this effectively is the most important factor in creating a winning robot. Design revisions are an integral part of the engineering process. In this article, I’ll be covering how my team’s robot — The LGBTerror — has evolved and how we tackled our revisions to improve the overall design.
Our basic approach to revising our robots is based heavily on the damage taken from fights. We analyze the damage we’ve received and document it so that we have a better idea of how it happened and how we can design against it from happening again.
To convey this, each version of our robot covered in this article will talk about the design and updates first, and then about the post-fight damage. Let’s jump in!
Version 1 (Bot Brawl Ontario Event #7)
Version 1 of The LGBTerror was rough; having been built in only 25 days and with zero prior wiring experience, the goal was just to make the competition. This bot was very heavy; there was no weight for a weapon at all due to the entire chassis being made of 3/8” UHMW with heavy garolite top and bottom covers, as well as overweight unoptimized configurations to boot.
The two configurations available for V1 were a Sawblaze (2018) style 3D printed dual scoop which was run against any bot without a scary spinner weapon and a double walled shield for the rest. The drivetrain was a direct drive system powering doubled-up 30A BaneBot wheels (Figure 1).

FIGURE 1.
Post Competition:
On the way to the competition, there was only one bot that looked so scary we didn’t want to face it: fellow writer, Nik Buchholz’s bot Phantom II. Of course, our first fight was against him.
This would turn out to be the only fight where the shield’s durability would be tested; all other fights minus one used the wedges.
Overall, we walked out of this event with a 3-2 official record, although sadly, one of those losses was against Nik. The damage we took included a heavily mangled front shield with a destroyed side support to go with it, all courtesy of Phantom II.
We also destroyed multiple drive gearboxes and broke two drive motors. This minimal damage was much better than the full write-off we were prepared for, so with big smiles we started redesigning for our next competition.
Version 1.5 (Bot Brawl Ontario #8)
Our design goals coming out of our first event were pretty straightforward: Make weight for a weapon and generally improve the attachments on our bot since we were aware how lucky we were to avoid the mutilation we did, and we knew it would most likely not happen again. With these redesign goals set, we turned out V1.5 (Figures 2 and 3).
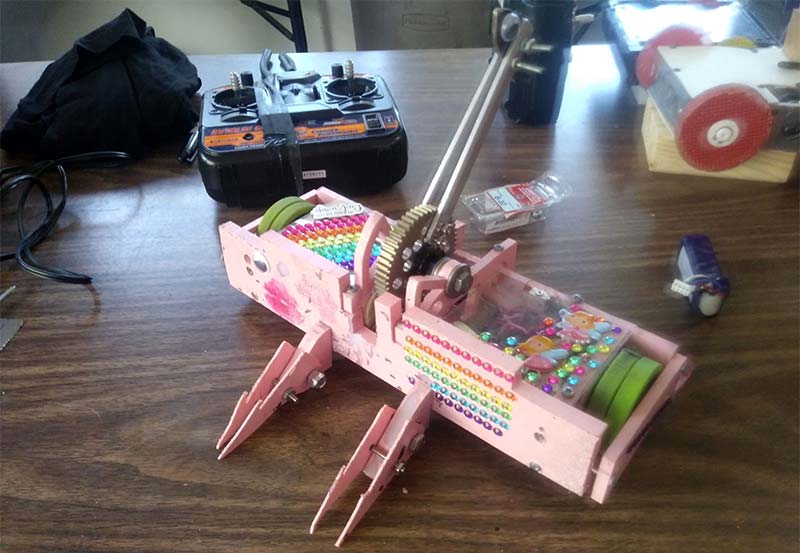
FIGURE 2.
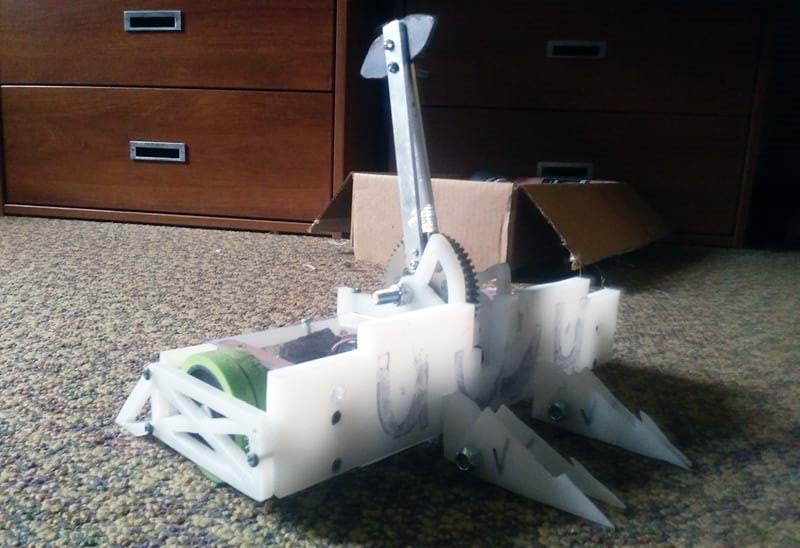
FIGURE 3.
For this version, the base chassis dimensions stayed the same, but the bot was nonetheless heavily updated. With weight reduction in mind, most chassis walls were remade using 1/4” UHMW.
This time around, a scroll saw was used to lighten the chassis with truss work rather than just drilling out speed holes. Definitely a much more efficient way to cut weight!
Despite destroying so many gearboxes in the previous competition, the drivetrain remained the same with the exception of the new VEX 29 ESCs (electronic speed controllers). Both attachments had been redesigned, with new hinged UHMW wedgelets replacing the heavy 3D printed scoops, and the shield module receiving a massive simplification.
The previous double-walled design was dropped entirely in favor of an un-swiss cheesed 3/8” front wall with a piece of grade 2 titanium covering it. Interestingly, the metal shield was cut using a hammer and chisel (Figure 4).
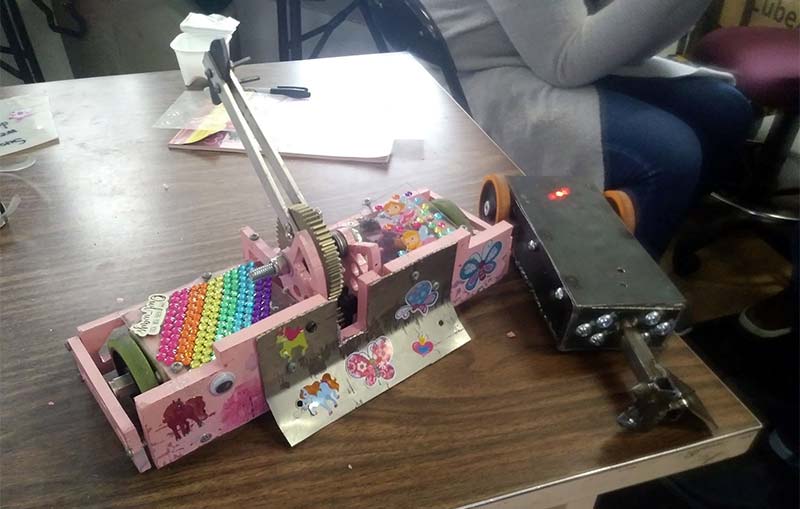
FIGURE 4.
Finally, our most obvious update for V1.5 was our hammer. Driven by a brushless FingerTech motor and a 14:1 planetary gearbox mated to a 3:1 additional gear reduction, this hammer was the result of all the weight cuts around the robot.
Post Competition:
This competition was our best one to-date. While we walked out of the competition exhausted with a heavily damaged bot, we also ended up leaving with a 2nd place trophy!
In terms of damage, there was quite a lot more than the last event, due to both our finals run and the fact that we had to face three nasty vertical spinners.
In addition to our continuing gearbox killing issues, after every match we had to tear apart the entire weapon and drivetrain to retighten all of the set screws. Only after the competition did we realize we needed to start using a thread locker like Loctite — a trick considered essential by all serious builders.
Our weapon didn’t take damage other than to the large gear that we mounted our hammer to. It turns out the gear was too forward in the bot and the large cutout directly in front of it was enough for one of Canada’s scariest bots (Dempsey Roll) to stick its spinner in and grind off half the teeth in the front.
This left us unable to self-right after we were flipped by him, but by amazing coincidence the hit that flipped us knocked out Dempsey Roll as well, and we got credited with the win via double KO.
The final thing that we noticed had to be redesigned was our front wedgelets and shield. While these were both massively improved from the previous versions, there were issues still to be solved since in one of our matches, one of the wedgelet mounts fell out, and in another match our shield’s corners got entirely curled up (Figure 5)!
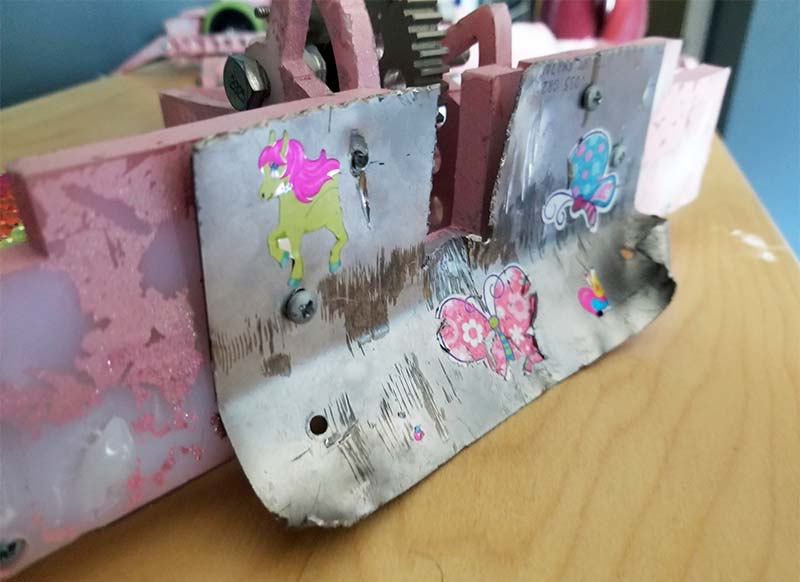
FIGURE 5.
Post event, it was discovered that the screw that was used to mount the wedgelet didn’t go through the interlocking part far enough. As for the shield, we found that the type of titanium used was actually a weaker version of titanium when compared to “grade 5,” which is commonly used in combat robotics.
Looking forward, the redesign goals we set out for V2 included: fixing the wedgelets in place better; swapping to a grade 5 titanium shield; moving the hammer back; and fixing our gearbox shredding issues.
Version 2 (Motorama 2019)
The V2 update was the largest technical update in terms of design changes as well as building techniques. This was also the first version to have a full CAD model. These advancements couldn’t have come at a better time as we debuted this version at Motorama 2019 (Figures 6 and 7).
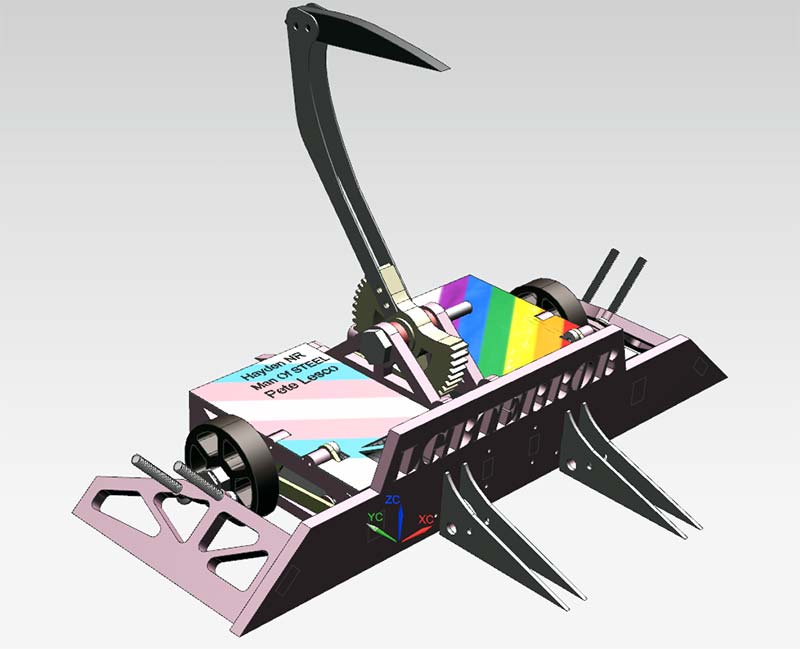
FIGURE 6.
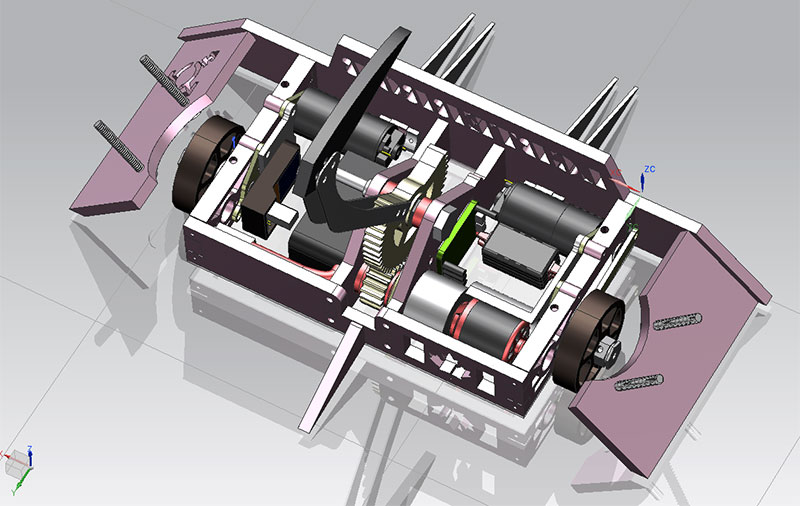
FIGURE 7.
Arguably, this is the most competitive event in eastern North America! Many combat competitors have made small-scale prototypes of their TV appearing robots at this competition; both HUGE and Sawblaze have roots in this event.
Our team’s first-ever use of waterjet-cut parts can be seen heavily throughout the design. This was used for two separate wedgelet designs; newly designed hammer arms; titanium top covers; and a front shield as well as motor and axle mounts for the redesigned drive system.
A much heavier AR400 hammer head, branded front and rear walls, and a new top gear were also cut out via waterjet. These were our largest advancements in building techniques across all versions and the first parts not made in a garage or basement (Figure 8).
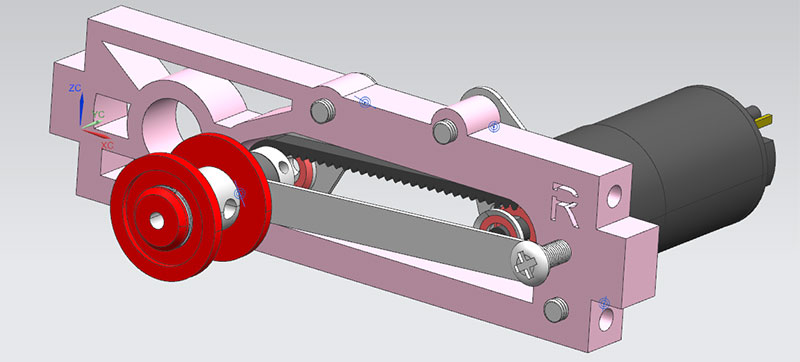
FIGURE 8.
As previously stated, the drive system got its first ever update for V2. After tiring of shredded gearboxes, a custom designed indirect drive system was incorporated. This used FingerTech belts and pulleys as well as the previously mentioned waterjet-cut titanium.
As for the overall chassis dimensions, a lot had changed. We shrunk the electrical board length by 3” and managed to drop the height of the chassis by 0.25” to save even more weight. The hammer’s top gear was moved back into the chassis and the implementation of a kinked hammer arm allowed us to fully eliminate the opening in the front wall that was in V1.5.
Visually, the most interesting update was the implementation of plastic sloped side walls. These were put in place to try to send horizontal spinners skywards, and was inspired by the Lockjaw vs. Valkyrie fight.
Post Competition:
Unfortunately, we didn’t learn a whole lot from this competition since we only had two official fights. The first one was versus a horizontal spinner called “Squishy,” who quickly showed us that our sloped side armor was laughably underprepared to take on a direct hit.
Our side armor flew off the second it was touched. We tapped out very soon after as we lost a drive side and were admittedly terrified to try to continue.
We found out post-match that nothing mechanical broke in our newly designed drive system. Unfortunately, our VEX 29 ESC wasn’t able to deal with the large motor and blew up as a result. So, we regrettably wired in FingerTech Tiny ESCs thinking these could take the amps. We were sorely mistaken and couldn’t move to our next match, leading to a very early end to a competition.
Version 2.5 (HORD at Colossalcon 2019 and Bot Brawl Ontario #9)
Without much damage to iterate off of from Motorama, we mostly just fleshed out our module arsenal for V2.5. We decided to go back to our old sidewall design and added the option to add 1 mm titanium to the sides. We also swapped the drive ESCs to a flashed 12A ESC purchased from Kozbots.com.
Some of the parts that were added to our module’s list included brand new AR400 wedgelets, as well as three new AR400 hammer heads and a front shield meant to be used in conjunction with the wedgelets as shown in Figure 9.
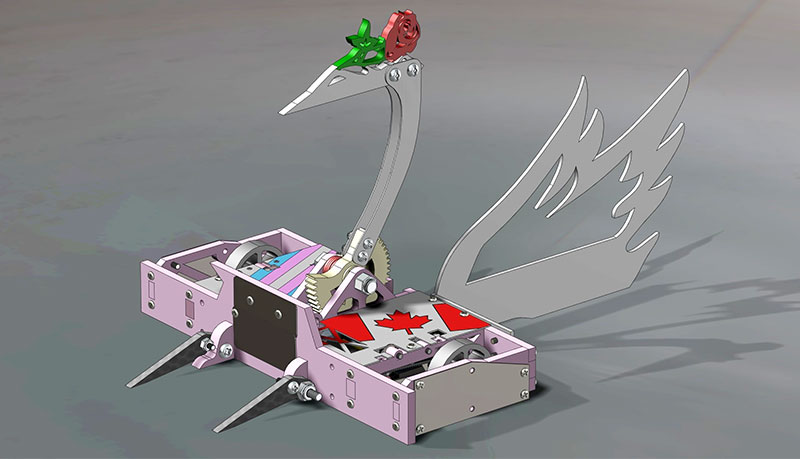
FIGURE 9.
This design was run more or less unchanged at its two competitions. With heavy radio issues during the first fight and weapon reliability issues at both events, there was once again a growing list of things to redesign.
This is how The LGBTerror sits at the time of this writing. There’s a full CAD assembly of this version available on The LGBTerror Facebook page (https://drive.google.com/drive/folders/1p7iRpovOl2thBDHB-Mb6UuS5fLgo5nn6?fbclid=IwAR2hZfwSvvZCn35MlzscaU7s2OtTfetxZFdnK1lU_QQWlZx7OW7oyfID-fw) as a resource for other builders to look at. Please check it out!
Conclusion
Over its four different versions, our bot had many upgrades, with some being better than others. The most useful upgrades we made include the use of Loctite — which massively improved our drive and weapon reliability — and our continued focus on weight reduction and weight redistribution.
This was vital since it allowed us to use weight where it was needed most: for armor upgrades; a more devastating hammer head; and even weight for our beautiful swan tail.
However, if we had to pick the most effective design change over all versions, the answer is easily our implementation of waterjet-cut parts.
In such a destructive sport, you’ll get to a point where the types of metal that are used for armor can’t be cut by garage tools: grade 5 titanium as well as any type of tool steel come to mind.
While you can easily make a robot using wood working tools and UHMW plastic (as we have), the addition of these high strength materials improved every part of our bot, from the armor to our weapon.
If you are currently in a league or looking to join a league, I suggest you ask around social media to see if anybody is doing a joined waterjet purchase. Having multiple people in one order reduces the price massively. It is more than worth it to have the ability to have high grade metals worked into your design.
As we stated at the beginning, the revision process is the most important part of the design process and the quickest way to make your own robot more competitive.
While The LGBTerror is far from a winning robot at this point, our approach has helped us fix multiple issues with our design, and with massive changes right around the corner, who knows what the future has in store for us!
Good luck, builders! See you in the battle box soon! SV
Article Comments