FlameBots for Battle
By Brice Farrell View In Digital Edition
So, what if you want to actually set another robot on fire when competing? What then? In this article, we’ll discuss the techniques that BattleBots™ competitors use.
We’ll start by looking at the flame pyramid. For BattleBots, we have:
- Fuel: Butane, propane, or both
- Oxidizer: Atmospheric oxygen (onboard oxidizers are — for good reason — banned)
- Heat: Hot surface ignitors, spark generators (tasers), or pyrotechnic ignitors

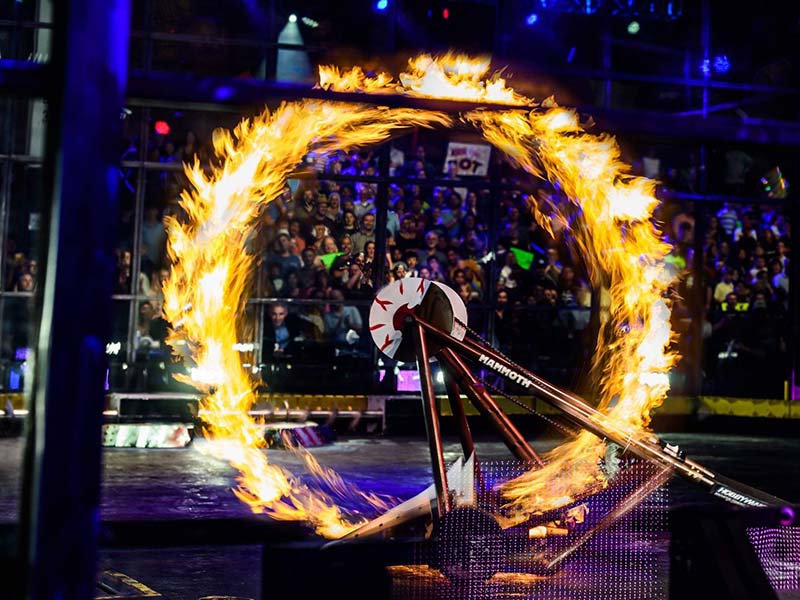
Mammoth’s weapon spun, providing centrifugal force so that the can was always pointed “down.”
Fuel
There are two allowable options for fuel in robot combat events: butane and propane. Even if these weren’t mandated by the rules, these are the only sensible choices as gas-fueled fires are significantly easier to predict, control, and extinguish compared to a liquid-fueled fire.
Butane
Prepackaged butane is the easiest and smallest option — important considerations when building a flamethrower for a minibot. Similarly, with my Battlebot Mammoth’s trunk, I had to fit the entire flame system within a tube only 2” in diameter.

Mammoth’s in-tube flamethrower, demonstrating the prepackaged butane solution.
Butane canisters for refilling lighters come in multiple sizes and feature internal valves. Using a servo to squeeze the can forward gave me the ability to control how large the flames are.
More pressure on the can will open the valve wider, letting more gas escape. However, using a servo with no return spring to control the fuel is a safety concern.
If my bot were to lose power (let’s say, hypothetically, as soon as I opened the valve, my robot got kicked across the arena and the power link flew out), the servo will remain open, which would mean uncontrolled flames.
The combat-approved solution for this is to use a massive solenoid to squeeze the can forward, either directly or using a lever-arm. When power is lost, the solenoid releases and the gas supply is cut off.
A butane system will have flames 2-6 feet long, depending on the orientation of the can. If it’s angled upwards, the can will supply gaseous butane, resulting in easier ignition but smaller flames.
If the can is angled down, liquid butane will spray out and gasify in the air, providing extra flame and range — but the ignition will be tougher.
There is one main drawback with this style of butane system: It’s delicate. The can must be loose enough to slide when actuated, but constrained enough to prevent jams during those car-crash scale hits that make robot fighting so much fun.
Disclaimer: Safety first! Burns, frost bite, homelessness, and even death are all possible. Stay safe and please don’t sue us. Clearly, I am not a lawyer, so here’s an actual disclaimer from actual lawyers Evan and Bryce Woolley — who are also the builders of BattleBot’s Double Jeopardy:
Disclaimer: Fire is dangerous. Robots are dangerous. Putting a flamethrower on a robot is especially dangerous. Doing so could result in serious injury or death. The following is intended to be educational and entertaining. This article is not intended to encourage dangerous activity. See Herceg v. Hustler Magazine, Inc., 814 F.2d 1017, 1021 (5th Cir. 1987) (informational article did not incite dangerous activity). Readers should not try this at home. Whenever building a robot, you should always follow proper safety procedures.
Propane
Propane systems are more resilient, but much more complex. They require a reservoir to store the gas, a regulator (or needle valve, but preferably regulator) to step it down from the 150 psi it’s stored at to a usable 20-30 psi, and a solenoid valve to turn it on and off. In addition to being more reliable, propane systems are also advantageous by being scalable.
I’ve used 1/4” valves and fit the entire system on a 15 lb bot. I’ve also used 1” valves and accumulator tanks on a scaled-up system to throw fireballs 40’ in the air.
Mammoth is being rebuilt to use propane for one simple reason: It allows more fire, and more fire is always better.
Additional Safety Techniques for Propane Systems
Use a metal solenoid valve. The expanding gas will freeze a plastic valve, making it brittle and possibly jamming it open. Add a screen to the inlet of the valve to prevent debris from entering and jamming the valve (Free Shipping told me about this trick; thanks guys!).
Use a mechanical valve in addition to the solenoid valve. This allows you to manually prevent the system from firing while you work on it.

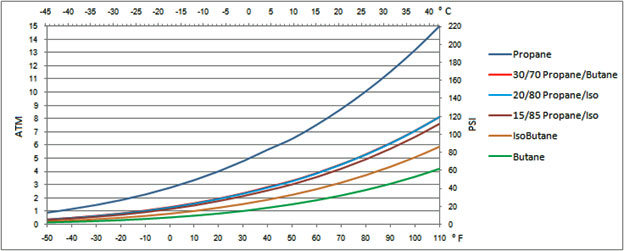
Pressure vs. percent of composition of propane-butane mixture (https://zenstoves.net).
Hybrid
There’s one more fuel option: “IsoPro” is a mixture of propane and butane. This has the simplicity of butane but at a higher pressure.
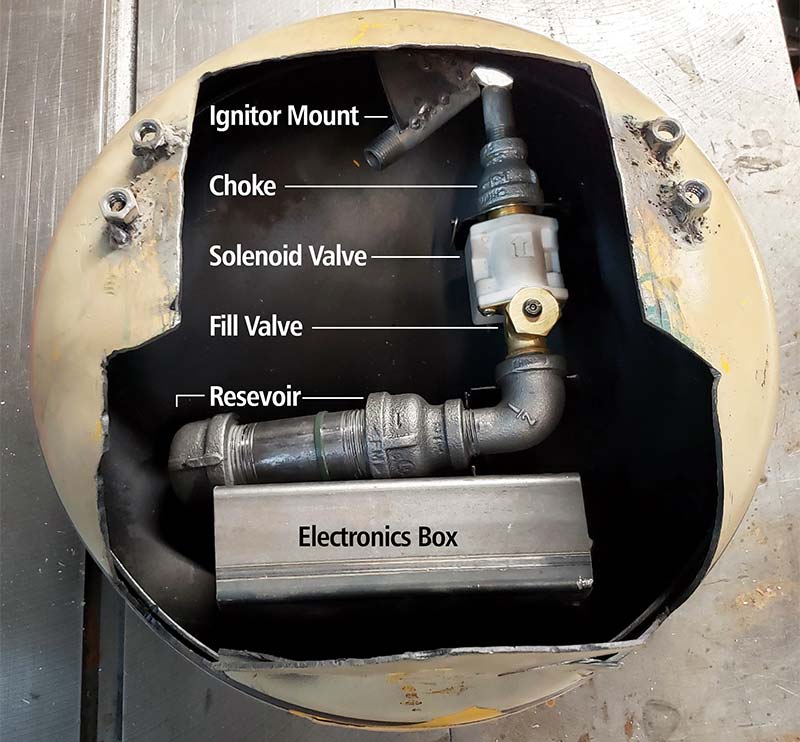
Additionally, one can build a system using the reservoir and valves from a propane system, but filled with butane instead.
You will still want to choke the tubing to limit the gas flow immediately after the solenoid, but this eliminates the need for a regulator as butane’s vapor pressure is a reasonable 30 psi. This is what I used when I rebuilt Shorter Pounder, as I needed something compact enough to fit inside the minibot, but robust enough to survive being launched across the arena.
Ignition
Now that we’ve covered the fuel, we need to move on to ignition systems. The most important piece of the ignition puzzle is placement.
For any ignition system, the prime location is in the edge of the fuel-air mixture, but out of the direct blast. This ensures there is enough oxygen and keeps them from being robbed of all their heat by the expanding (and thus cooling) gas. I aim to be about 1” away from the fuel outlet, and usually 1/2” out of the center of the flow.
Mechanical Spark Generators
These scale from the small flints on top of a zippo to angle-grinders shooting sparks several feet through the air. I’ve seen spark ignition used once or twice, but in my personal experimenting, I’ve found these systems to be very unreliable. The sparks themselves don’t have enough energy in them to compensate for the large volume of very cold gas that the tank will release.

Shorter Pounder’s v2.0’s flame system, demonstrating the hybrid approach; electronics not shown.
Electrical Spark Generator — a.k.a., Taser Ignition
Taser ignition is reliable, cheap, and easy. A “5V to 20 kV module” is a cheap way to reliably ignite most flamethrowers. For larger robots, a “Tesla coil driver board” with a high kV transformer will provide an even stronger spark given an input voltage between 18 and 24 volts.
Homebrew spark gaps are usually a long fight trying to force the spark to occur in the desired area, and not some shorter path further away from the flame. An automotive spark plug makes an excellent ignition gap. They provide a fixed gap in a nice fireproof package.
Standard spark plugs have an internal resistance of ~3 kohms, but non-resistive spark plugs are available and will produce a better spark.
The downside to taser ignition is electrical noise. The erratic high frequency/high voltage induces electrical noise throughout any circuitry nearby and can knock out radio communications. I’ve never ran spark gaps in robots, so I spoke to Randy Farmer of Bombshell for some insight:
“We ran our [spark system] on a totally different radio, with isolated grounds, a dedicated battery, and programmed the spark to turn on and off at around 5 Hz.” This pulsing of the spark prevents long-term interference and makes sure you can always get a signal through to the system.”
Randy also recommended isolating the spark generator in its own Faraday cage, and using anti-spark connectors everywhere.
Hot Surface Ignitors
Hot surface ignitors (HSI) are designed for gas furnaces, fireplaces, and grills. They resistively heat a silicon-nitride tip to over 1,000 degrees, and can do so at 20-24V with only a few amps of current draw.
There are two main disadvantages to HSI: They are especially sensitive to placement relative to the fuel stream; and they are delicate. So delicate you should plan to replace the ignitor after every match.
On top of having a handful of spares, I’ve started designing bots to use two HSI at once or have a pyrotechnic backup to the HSI. Most of the flame-throwing robots in BattleBots use these ignitors, so watch closely and see if you can spot a half-inch long ignitor glowing bright orange next time you see a flamethrower bot fight.
Pyrotechnic Ignition
Civilian-grade e-matches are now available online and offer reliable ignition in under five milliseconds with very low power requirements. That said, they are also heat, impact, friction, and static-sensitive explosives, so there are a number of safety requirements for using them — especially in robotics.
Safety Requirements:
- Ignitors must remain short-circuited until ignition, even in storage.
- Mechanical blocks must be used to cover the e-matches until the fight.
- E-matches must be stored in a non-sparking and anti-static container.
In addition to all the safety concerns, e-matches only allow a limited number of flame-bursts. Mammoth is built using six paired ignitors. This means we only have three opportunities to breathe fire per match, so we need to be strategic with them.
General Safety Concerns
Combat robotics is always dangerous, and flamethrowers are even more so. Use an independent power switch/link. Always fill and test gas systems in a well-ventilated area; outside if possible. Check for leaks after every fight, no exceptions! Never use mechanical relays (“battleswitches”) to control valves or solenoids. Large shocks inside or outside the arena can cause it to misfire.
Personally, I’ve been very happy using small brushed ESCs to drive solenoids, HSIs, valves, and e-matches. HobbyWing provided ESCs for Mammoth’s flame system and the ESCs were smaller, safer, and much more reliable than the relays used in the first version of Shorter Pounder.
Hopefully, you now understand the basics of flamethrowers in combat robots and can appreciate them that much more. I’ve intentionally left some aspects of building flame bots out of this article.
If you’re interested in building your own robot, hopefully I’ve pointed you down the right paths for your future research. Stay safe, and maybe someday you’ll set someone’s robot on fire.
If you’re lucky, it will be someone else’s! SV
| Team Name | Fuel | Ignition | Special Notes |
|---|---|---|---|
| Anonymous Minibot | Butane/Propane | HSI | For safety reasons, the gas canister can be mechanically isolated from outside the robot. This is highly recommended. |
| Team Bad Kitty: Crazy Cat | Butane | HSI | Mad Catter’s minibot. |
| Team Busted Nuts Robotics: Shaman | Butane | HSI | Witch Doctor’s minibot adds a secret mix of ingredients to the butane for green flames. |
| Team CE Robotics: Kraken | Butane | Custom Kanthal wire HSI | - |
| Team Half Fast Astronaut: Blacksmith | - | - | Excluded at builder’s request. |
| Team LiMitless Robotics: SawBlaze | Butane | HSI | Green flames are a team secret. |
| Team Mammoth: Mammoth | Butane | 6x e-match | - |
| Team Poor Life Choices: Shorter Pounder | Butane | HSI | Battle Royale with Cheese’s minibot. |
| Team Ram Robotics: Gruff | Propane | 2x HSI | Special airflow allows flame temps over 2200°F. |
| Team Special Delivery: Free Shipping | Butane | HSI | Don’t try this at home. |
| Team Toad: Spitfire | Butane/Propane | Spark gap | Texas Twister’s drone. |
| The Machine Corps: Chomp | Propane | HSI | - |
Article Comments