
Experimenting with Walking Robots — Walking Up and Down Hills
By John Blankenship View In Digital Edition
This series of articles has explored many aspects of walking robots from the unexpected side effects of various movements to the need for sensors and how to utilize them. This final installment utilizes many of the principles discussed to create a robot that can navigate inclines as easily as level terrain.
Most walking robots built by hobbyists walk by transitioning between various static poses; an approach that — while relatively easy — has many limitations. In addition, affordable walking robots are typically powered by inexpensive servo motors which have limited torque for small movements, imprecise repeatability, and significant play in their gear trains. A major goal of my experimentation with walking robots was to determine ways of dealing with these limitations.
The experimentation also revealed that two walking robots can be far different from each other when compared with two wheel based robots. This simply means that techniques that work for one walker might be more or less successful with another, due to differences in the two robots such as the center of gravity, the number of joints, and the quality of the motors and sensors used.
Perhaps the most important revelation is that building a walking robot with hobby-level hardware is extremely difficult; certainly far more difficult than I expected. On the positive side, walkers provide a very different experience for hobbyists and when something finally works, the process can be very rewarding.
This final article of the series demonstrates how applying some of the principles discovered during experimentation gave my robot the capability to walk on a sloped terrain as well as a flat surface.
A Basic Principle
A basic principle of my walking process is to always know where the major joints are currently located, so that it’s easy to move to the next position. To that end, my software always moves major joints in fixed increments. Let’s look at an example.
Suppose we want the robot to take a step of size “D.” It might start by lifting the leg, then extending it. Lifting the leg could be accomplished by moving the thigh forward D degrees and the knee backward by the same amount. Note that this would move the leg slightly forward while keeping the foot parallel with the floor as shown in the left side of Figure 1.
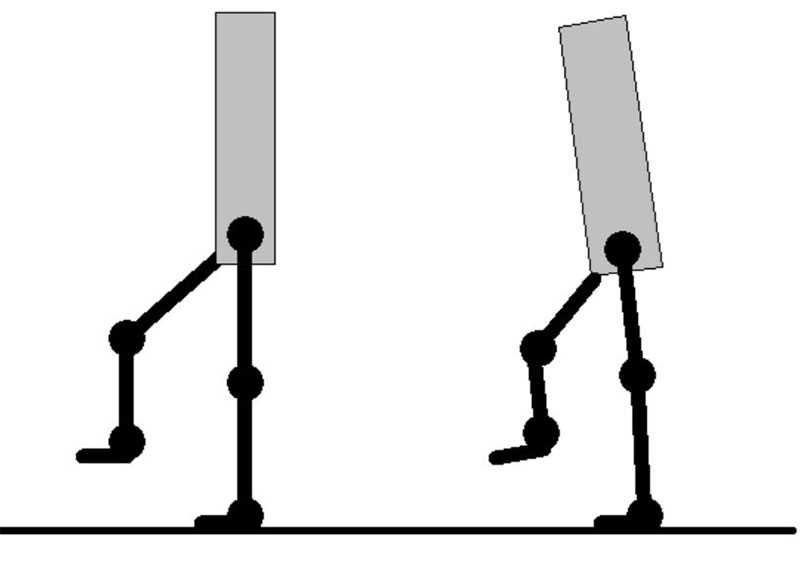
FIGURE 1.
After a short delay, we could extend the calf portion of the leg forward (again by D degrees), but in order to keep the foot parallel with the floor, we also need to tilt the ankle forward by D degrees. Always moving the joints in increments of D degrees makes it easy to keep track of their current location.
The problem is that sometimes when you move a robot’s leg, it might not appear to be in the position you intended. If the weight of the raised leg, for example, causes the robot to lean forward due to stress on the motors and gear train in the supporting leg, then the extended foot would certainly not be parallel with the ground (see the right side of Figure 1).
The left side of Figure 1 looks the way we want the robot to look after the leg is raised, but the right side is probably how it will actually be with most servomotors. Often, people programming a walking robot like this will try to adjust the amount the joints are moved to make the robot look like the left side.
Unfortunately, if the stress is relieved from the supporting leg (perhaps by the next movement which changes the robot’s balance), the robot’s new position will be far different than what you’re trying to accomplish. If you try to keep the robot posed as expected (rather than always using fixed movements), then figuring out how to move to new positions (that might have different balance issues) can quickly become an unmanageable task.
The best solution is to try to keep the robot balanced, but ultimately, you should simply accept that the robot may not always appear exactly as expected. If you assume the robot’s joints are where they’re supposed to be (no matter how they look) and move them accordingly, the robot — over time — will generally end up reasonably close to where you expect.
The Code
Figure 2 shows the top levels of my walking code application.
Application:
gosub InitApplication
delay 500
// local variables to control walking
_DesiredXtilt = 100 // used for balance with arms
_DesiredYtilt = 100
_LeanAngle = 12
_PrimaryStepSize = 25
call FindBalance(CurSlope)
_CurrentSlope=CurSlope
_StepSize = _PrimaryStepSize+_CurrentSlope // Step higher going up hills (lower/down)
_DesiredYtilt+=_CurrentSlope
_DeltaXtilt = _LeanAngle/5
// adjust body for hill walking
call FromCurServoPos(Rthigh,_CurrentSlope) // lean back going down slope
call FromCurServoPos(Lthigh,_CurrentSlope) // and forward going up
delay 500
call Walk(4) // 4 steps
return
sub Walk(Num)
gosub InitServoNames
gosub StartWalk
delay 1000
stepping _MODE
for i=1 to Num
call TakeStep(RGT)
call TakeStep(LFT)
next
gosub StopWalk
return
FIGURE 2.
The first sub-routine called in this code is FindBalance, which was discussed in Part 4 of this series. It causes the robot to autonomously maintain its balance as the board the robot is standing on is tilted to create an up or down slope. An important aspect of this routine is that it returns the slope of the floor (see Part 4 for more details).
The code in Figure 2 also establishes some global variables (names that begin with underscore are global in RobotBASIC) that will be used to control the walking routines. Using global variables allows them to be accessed from within RobotBASIC’s sub-routines which utilize local variables. This minimizes the need to pass parameters that are needed by many routines.
Once we know the slope of the floor, it can be used to alter the step size (this is basically the D value mentioned earlier). In general, adding the slope of the floor to the primary step size will cause the robot to step higher when it’s moving up an incline and step lower when it’s going downhill. Various parameters such as the lean angle are also set in this routine. The lean angle is how much the robot should lean in order to lift the opposing foot from the floor. You could arrive at parameters like this experimentally or even have the robot do it autonomously by leaning until the foot switches indicate the foot is off the floor.
A variable DeltaXtilt is also created that indicates how much the accelerometer readings will change when the robot leans to one side to take a step. The number is just an approximation, but it works well. We’ll see how these parameters are used shortly.
The final action before beginning the walk is that the robot will lean its body forward slightly if it’s going up a slope and backward if it’s going down. This is not required, but it does help the robot maintain its balance.
The Walk routine uses a loop to make right and left steps. Before the loop, a call to StartWalk leans the robot to the left (based on the variable _LeanAngle). When the final step is taken, StopWalk leans the robot to the right to return the robot to its normal standing position.
Taking Steps
The difficult work is performed by the routine TakeStep which can perform either a right or left step. In either case, TakeStep assumes that the robot is already leaning appropriately, so that the stepping foot is off the ground. The routine ends with the robot leaning in the opposite direction, so it’s prepared for the next step. The actual step is accomplished by calling four routines as shown in Figure 3.
sub TakeStep(leg)
call LegForward(leg)
call BodyForwardOverFoot(leg)
call LeanToCenter(leg)
call StartOpStepPosition(leg)
return
FIGURE 3.
These four routines will move the stepping leg forward, bring the body forward over the stepping foot, lean the robot back to the center to regain a good balance, and finally lean further so the robot is ready to step with the opposite leg.
Moving the Leg Forward
The routine LegForward is shown in Figure 4.
sub LegForward(leg)
amount = _StepSize
gosub InitServoNames
call FromCurServoPos(leg+1,amount)
delay 300
call FromCurServoPos(leg+3,5) // raise toe slightly to prevent stubbing
call FromCurServoPos(leg+2,-amount)
if leg = RGT
call BalanceWithArms(100-_DeltaXtilt,_DesiredYtilt)
else
call BalanceWithArms(100+_DeltaXtilt,_DesiredYtilt)
endif
delay 500
call FromCurServoPos(leg+2,amount)
call FromCurServoPos(leg+3,-amount-5) // lowers toe
call BalanceWithArms(100,_DesiredYtilt)
return
FIGURE 4.
It uses the leg value passed to it to access the different joints (+1 is the thigh, +2 is the knee, and +3 is the F/R ankle). In keeping with the philosophy discussed earlier, all joints are moved based on the current step size.
Notice also that the toe is raised slightly at one point to help prevent it from stubbing (in case the robot is leaning forward as depicted by Figure 1), and then lowered again at the end of the routine. Notice also that the final line in this routine moves the arms to improve the robot’s balance.
Executing this routine puts the robot in the position shown in Figure 5.
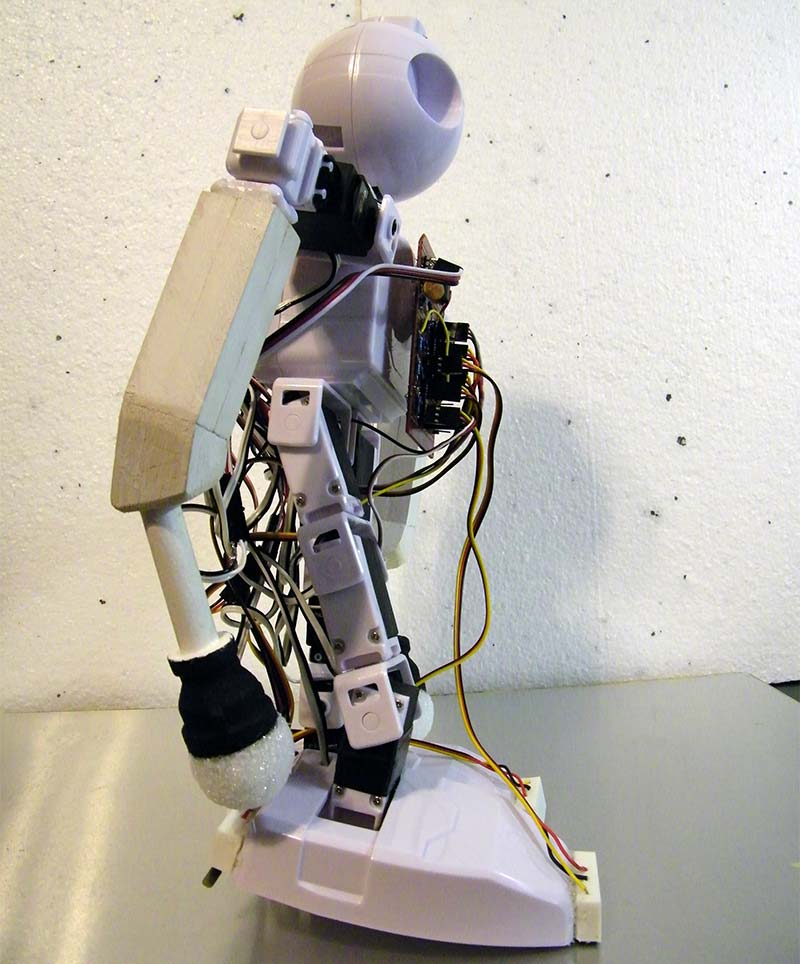
FIGURE 5.
Notice the knee and ankle joints are now in a straight line, extending the foot forward.
Moving the Body Forward
The routine in Figure 6 moves the robot’s body over the stepping leg.
sub BodyForwardOverFoot(leg)
gosub InitServoNames
SS = _StepSize
if leg=RGT
call FromCurServoPos(Rknee,-SS#4)
call FromCurServoPos(Rankle,SS#4)
call FromCurServoPos(Lthigh,-SS#4)
call FromCurServoPos(Lknee,SS#4)
for i=1 to 4
call FromCurServoPos(Rknee,-SS/4)
call FromCurServoPos(Rankle,SS/4)
call FromCurServoPos(Lthigh,-SS/4)
call FromCurServoPos(Lknee,SS/4)
call BalanceWithArms(100-_DeltaXtilt,_DesiredYtilt)
next
elseif leg=LFT
call FromCurServoPos(Lknee,-SS#4)
call FromCurServoPos(Lankle,SS#4)
call FromCurServoPos(Rthigh,-SS#4)
call FromCurServoPos(Rknee,SS#4)
for i=1 to 4
call FromCurServoPos(Lknee,-SS/4)
call FromCurServoPos(Lankle,SS/4)
call FromCurServoPos(Rthigh,-SS/4)
call FromCurServoPos(Rknee,SS/4)
call BalanceWithArms(100+_DeltaXtilt,_DesiredYtilt)
next
call
endif
return
FIGURE 6.
Because the robot is balanced on one foot while this is happening, the step-sized movements are divided into smaller actions and performed within a loop.
The use of RobotBASIC’s modulo operator (#) and integer divide ensures that each movement is fully completed. Notice that the arms are used to help maintain balance as the movement progresses.
Figure 7 shows how the robot will appear after this routine is executed.
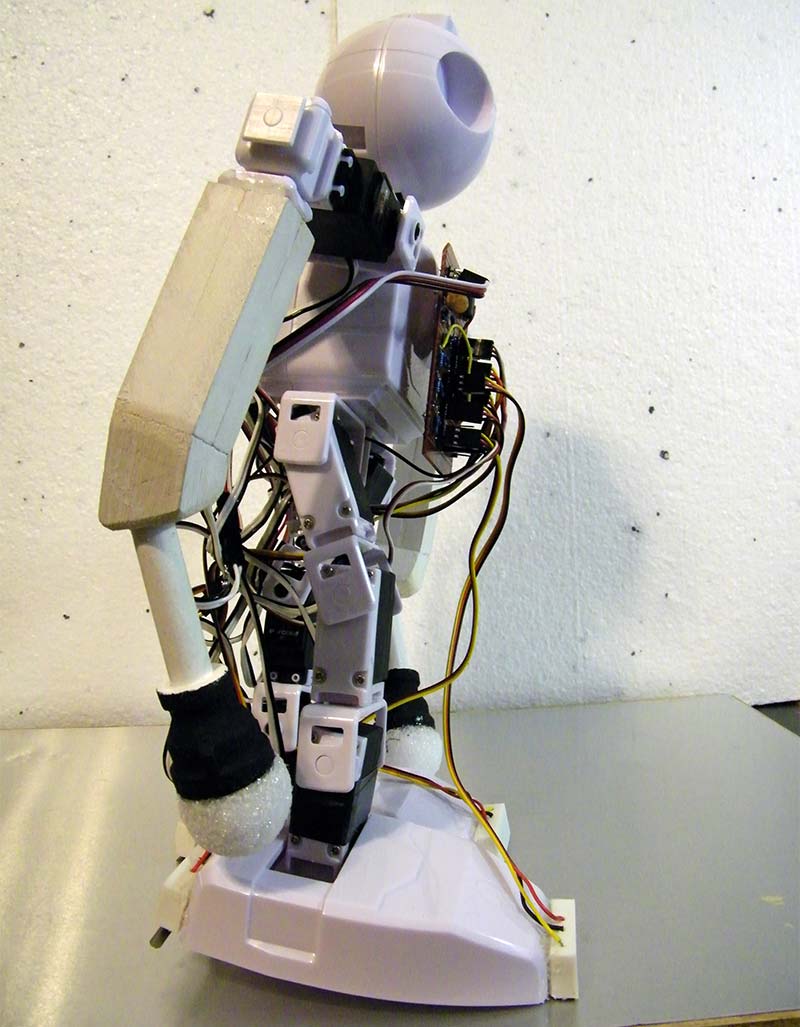
FIGURE 7.
This pose looks very much like Figure 5, but the body is definitely forward. Compare the knee and ankle joints in Figures 5 and 7. The camera angle makes these differences very easy to see.
Leaning Back to Center
At this point in the sequence, the robot is still leaning to one side, so it needs to move its weight back toward the stepping foot. Figure 8 shows how this is accomplished.
sub LeanToCenter(leg)
gosub InitServoNames
if leg=RGT
OpLeg = LFT
else
OpLeg = RGT
endif
call ShortenLegForStep(OpLeg,_PrimaryStepSize#4)
delay 100
call Lean(leg,_LeanAngle#4)
call BalanceWithArms(_DesiredXtilt,_DesiredYtilt)
for i=1 to 4
call ShortenLegForStep(OpLeg,_PrimaryStepSize/4)
delay 100
call Lean(leg,_LeanAngle/4)
call BalanceWithArms(_DesiredXtilt,_DesiredYtilt)
next
delay 300
return
FIGURE 8.
Basically, it shortens the leg the robot is currently standing on in order to lower the stepping foot to the ground. You might think the amount of this lowering would change if the robot is moving on an incline. The reason it doesn’t is because we have the robot taking a bigger (thus higher) step when it’s walking up an incline and a smaller (lower) step when it’s going downward.
This adjustment to the step size means the stepping foot will be approximately the same distance from the floor regardless of the terrain’s slope. This means we can always lower the robot a proper amount by moving the joints in the supporting leg by the _PrimaryStepSize initialized earlier (this is the step size for level terrain). Figure 9 shows how the robot will be positioned after this routine is executed. Notice the robot is well balanced, but the stepping foot is forward in the stance.
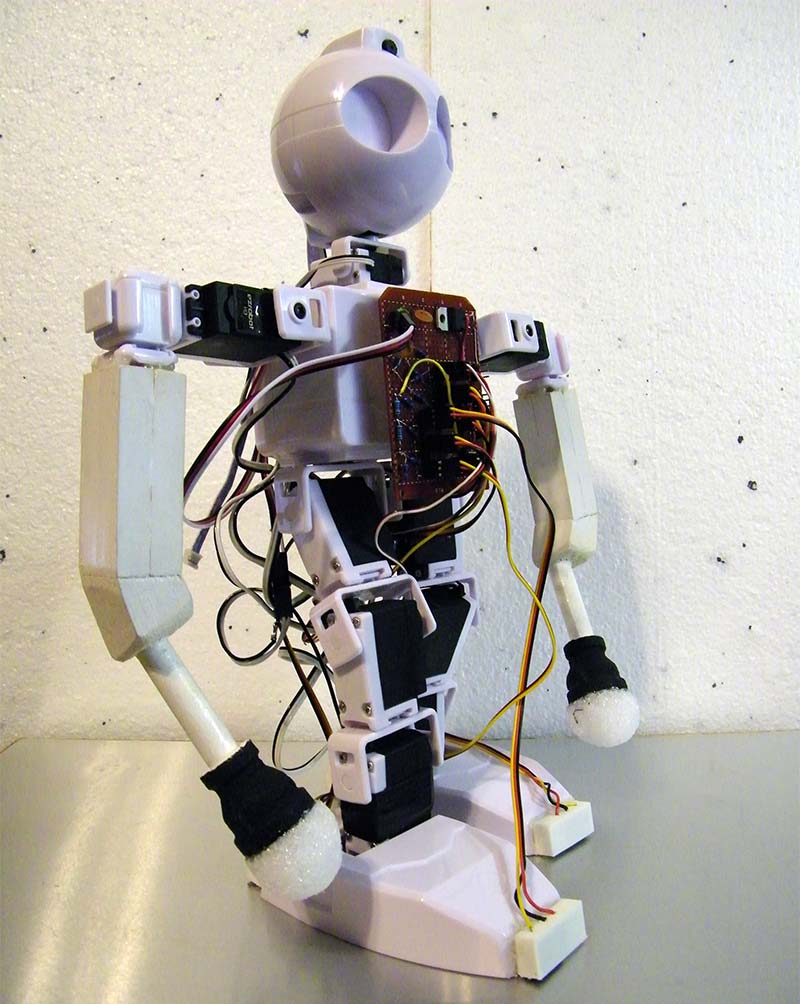
FIGURE 9.
The action of lowering the stepping leg to the ground is much different than letting the robot’s weight pull the body forward onto that leg.
This action helps the robot maintain its balance and is a vital move when walking up and down inclines.
Preparing to Step with the Opposite Leg
With the robot balanced on two feet again, the next action is for the robot to lean away from the leg that will make the next step. Figure 10 shows how this is accomplished.
sub StartOpStepPosition(leg)
gosub InitServoNames
if leg=RGT
OpLeg = LFT
else
OpLeg = RGT
endif
call Lean(leg,_LeanAngle/2)
call FromCtrServoPos(leg+2,0) // 0 forces startup angles
call FromCtrServoPos(leg+1,-_CurrentSlope) // maintains body tilt for
call FromCtrServoPos(OpLeg+1,-_CurrentSlope) // navigating a slope
call FromCtrServoPos(OpLeg+2,0)
call FromCtrServoPos(OpLeg+3,0)
call Lean(leg,_LeanAngle/2)
// balance based on current lean direction
if leg = LFT
call BalanceWithArms(100-_DeltaXtilt,_DesiredYtilt)
else
call BalanceWithArms(100+_DeltaXtilt,_DesiredYtilt)
endif
delay 500
return
FIGURE 10.
In this routine, all the joints are reset to their original balanced position (as was established by StartWalk, except that the robot may be leaning either left or right depending on which foot is stepping). This always leaves the robot ready to proceed with the next step or to return to the normal standing position.
Figure 11 shows how the robot is positioned after this routine is executed.
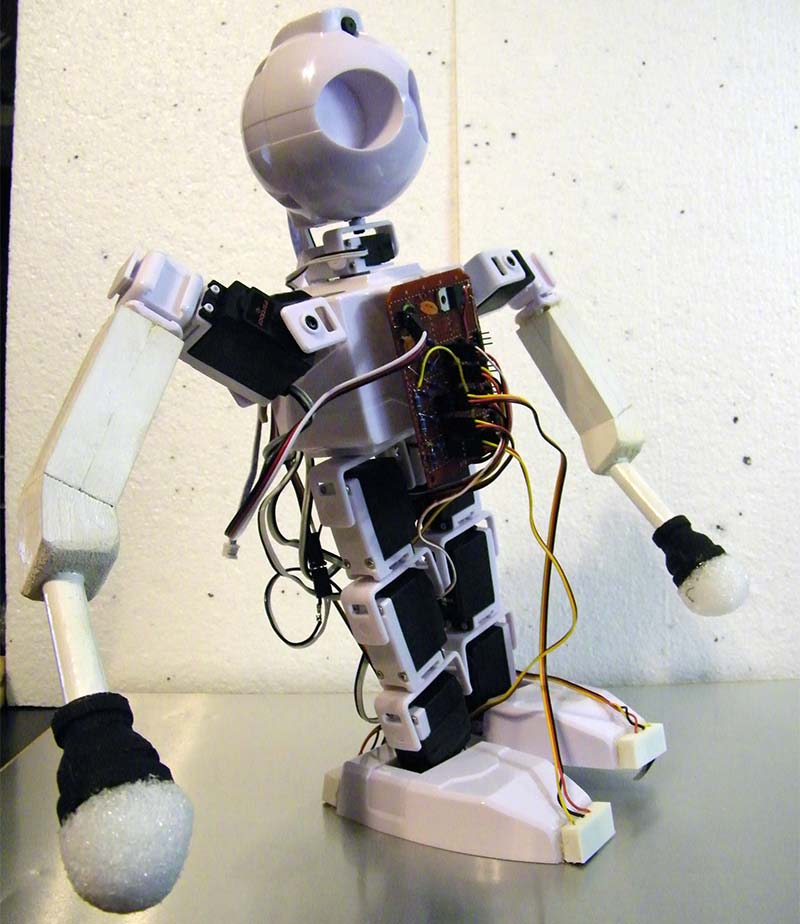
FIGURE 11.
Conclusion
Programming hobby-oriented walking robots can be both frustrating and rewarding. Experimenting with a variety of movements can greatly improve your understanding of the problems and ultimately help you find innovative solutions. Here’s a YouTube video demonstrating my robot in action: https://youtu.be/LB_uBJh5bQ8.
Watching it actively balance as it walks on different slopes should be exciting for anyone who understands how difficult this project is. I’m sure that fine-tuning properties such as delays, motor speeds, and balancing algorithms could greatly improve the robot’s performance, but at least for now, such modifications will be left for the motivated reader. SV
Article Comments