Experimenting with Walking Robots — Maintaining Balance
By John Blankenship View In Digital Edition
This series of articles explores the trials and tribulations associated with my experimentation with walking robots. This installment looks at various ways for a two-legged robot to maintain its balance.
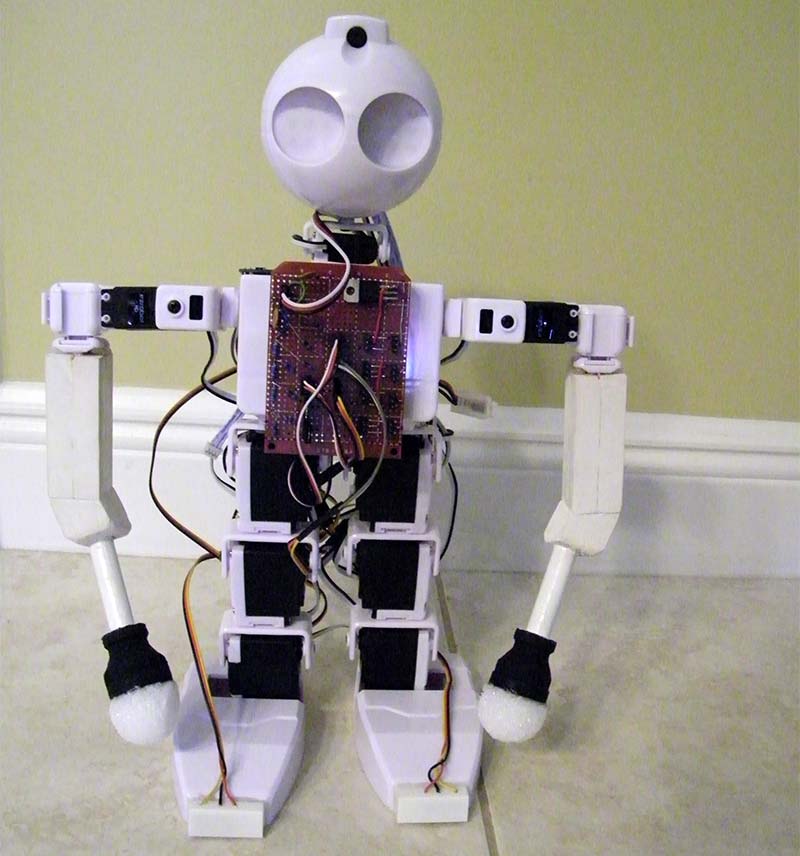
The robot in Figure 1 is a modified version of EZ-robot’s humanoid called JD. Each leg has a hip and knee, as well as an ankle with two degrees of freedom. The arms have weights for hands, making them only appropriate for balancing. Refer to earlier articles in this series for details on the robot’s hardware configuration.

FIGURE 1.
This article explores several ways for the robot to maintain its balance along with some of the problems associated with each method. Don’t worry if you don’t own this particular robot because this series intentionally emphasizes methods and algorithms that can be applied to a wide variety of platforms.
It’s unlikely that your robot will have the same characteristics as mine (center of gravity, power and speed of motors, number of joints, placement of sensors, etc.), so I’m not trying to provide a finished program that will work with any walker.
Rather, I want my experimentation to reveal beneficial concepts, as well as problems that might be encountered. Hopefully, these insights can motivate readers to experiment with walking robots.
Unexpected Side Effects
Hobbyists that haven’t experimented with a walking robot might not be aware of some of the problems associated with trying to maintain balance. For instance, almost any movement might have an unexpected side effect. Let’s look at a simple example.
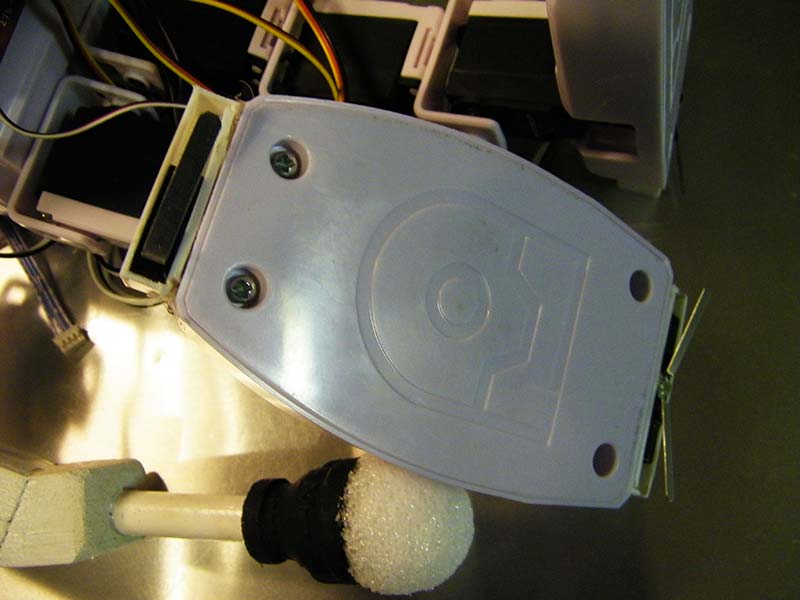
Generally, it’s important to make sure the robot’s feet are flat on the floor before trying to perform actions such as balancing or walking. The robot in Figure 1 has three switches on the bottom of each foot (one in the front, two in the back; see Figure 2) that can be used to determine the foot’s orientation with the floor (see the last article for details on these switches). Trying to align with the floor though, can potentially cause problems.

FIGURE 2.
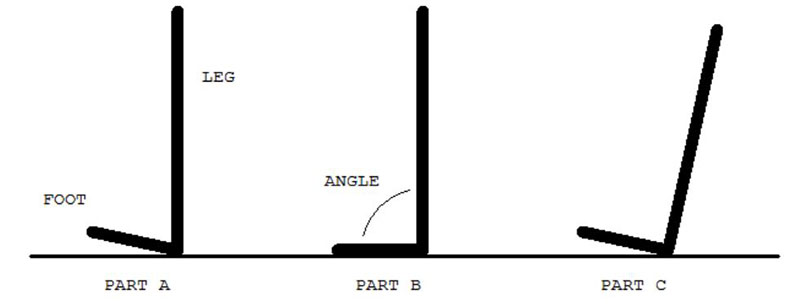
Assume that your robot’s right foot is oriented with the toe raised slightly off the floor. If your software determines this situation, it seems reasonable to lower the toe (until it reaches the floor) before trying to perform other actions.
Lowering the toe increases the angle between the foot and the leg as shown in parts A and B of Figure 3. Unfortunately, increasing the angle between the foot and the leg can also cause the leg to move backward (Figure 2, Part C).

FIGURE 3.
This simply means that initiating a movement that increases the angle between the foot and the leg may lower the robot’s toe toward the ground, but (depending on the robot’s current balance and other factors) it could just as easily move the leg backward instead.
Such problems are not intuitive to most people unless they experiment to test various actions in a variety of situations. Taking the time to test numerous ideas is essential if you’re going to understand the problems associated with programming a walking robot.
My experimentation indicates that you have the best chance of orienting a foot with the floor if the robot is already reasonably balanced and if the other foot is already flat on the floor. If these conditions don’t exist, there is a reasonable probability that trying to orient the foot will cause unwanted side effects.
The RobotBASIC code fragment in Figure 4 demonstrates how to flatten the left foot on my robot using the three switches mentioned earlier. The variable SW holds the switch states; refer to the comments in the program to see how the states relate to the foot’s orientation. Once your robot has a good footing, it has a better chance of balancing.
// bits b5, b4, and b3 of SW are the toe and heel switches on the left foot
// zero indicates switch is pressed
a=2 // amount (degrees) to move joints
if ((sw&00000)) and ((sw&01000)<01000) //toe up, heel touching somewhere
// move toe down (can cause fall back)
call FromCurServoPos(Lankle,-a)
endif
if (not(sw&00000)) and ((sw&01000)=01000) // toe down and heel is up
// move toe up to get heel on ground (can cause fall forward)
call FromCurServoPos(Lankle,a)
endif
if (sw&00000) and not(sw&01000) //outside of foot is up
// move outside down
call FromCurServoPos(Lfoot,a)
endif
if not(sw&00000) and(sw&01000) //outside of foot is down
// move outside up
call FromCurServoPos(Lfoot,-a)
endif
FIGURE 4.
Ways of Balancing
There are many ways to balance a robot, but they all try to alter the object’s center of gravity. Let’s look at three alternatives: moving the arms; adjusting the ankles; and bending at the waist. The robot could also try to tilt to one side by bending at the knee to shorten that leg, but that option was explored in Part 2 of this series so it won’t be discussed here. Let’s look at each of these options individually.
Moving the Arms
As mentioned earlier, the arms of the robot in Figure 1 are equipped with weights instead of hands. This makes it much easier for the robot to use his arms to alter his center of gravity. The nice thing about balancing with the arms is that there are minimal side effects, compared to other options. For that reason, I’ll expand more on this option than with the alternatives.
The RobotBASIC sub routine (RobotBASIC also has conventional BASIC subroutines without parameter passing) in Figure 5 tries to balance the robot by moving the arms. The routine GetTilt returns TiltX and TiltY based on the accelerometer reading (which were calibrated so readings of 100 indicate no tilt).
sub BalanceWithArms(DesXtilt,DesYtilt)
gosub InitServoNames
call GetTilt(TiltX,TiltY)
AmountX = 5 * abs(TiltX-DesXtilt)
if AmountX > 50 then AmountX=50
AmountY = 5 * abs(TiltY-DesYtilt)
if AmountY > 50 then AmountY=50
// left/right
if TiltX>DesXtilt // leaning left
call ArmsFromCtr(RGT,AmountX)
elseif TiltX<DesXtilt
call ArmsFromCtr(LFT,AmountX)
else
call ArmsFromCtr(LFT,0) // center
endif
// forward/back
if TiltY>DesYtilt // leaning forward
call ArmsFromCtr(BCK,AmountY)
elseif TiltY<DesYtilt
call ArmsFromCtr(FWD,AmountY)
else
call ArmsFromCtr(FWD,0) // center
endif
return
FIGURE 5.
The current tilt is compared to the desired tilt values passed to the routine. This allows the routine to try to balance when the robot is standing straight or when it’s leaning to one side to take a step. The amount of arm movement generated is proportional to the tilt error, but never more than 50 degrees.
The routine ArmsFromCtr moves the arms (from their center position) according to the direction and amount specified. Notice when no error tilt is detected, the ArmsFromCtr routine can also center the arms by passing an amount-to-move parameter of zero.
Building a library of routines that can handle basic movements and balancing can make programming a walking robot easier and a lot more fun.
Adjusting the Ankles
Trying to balance by moving the ankles can certainly have side effects as discussed above in the section on keeping the feet flat on the floor. It can be an effective tool though, if the robot has its feet flat on the ground and if the amount of imbalance is minimal.
The code fragment in Figure 6 uses the ankle joints to try to lean the robot either forward or backward in order to keep the robot in its normal vertical orientation.
call GetTilt(TiltX,TiltY)
a = 1 // the amount (in degrees) for the ankles to move
if TiltY >100 // leaning forward
call Lean(BCK,a)
elseif TiltY<100 // leaning back
call Lean(FWD,a)
endif
FIGURE 6.
Notice that this routine performs slightly differently than the one in Figure 5 (which corrected based on the size of the error). In this case, the correction is always a small amount because even slight ankle movements can shift the robot’s weight dramatically.
Similar code could balance the robot’s tilt to the left and right.
Bending at the Waist
Using the arms and/or ankles to balance the robot can be effective when minimal corrections are needed, but sometimes a more pressing situation must be dealt with. Trying to shift the robot’s torso by bending at the waist can sometimes get the robot stabilized enough for more subtle adjustments to work.
In general though, your software should constantly monitor the robot’s tilt and continually try to adjust it with small corrections.
The code for this process would look very much like that of Figure 6, but the robot’s thighs are moved instead of the ankles. If you’re thinking that moving the thighs seems more like a way to move the legs instead of the torso, then you’re starting to see the importance of understanding unexpected side effects.
In order to be truly effective, waist-balancing requires that the robot can tilt its torso from left to right as well as forward and backward.
Hobby walkers seldom have this capability which helps to explain why their ability to balance can be limited.
The Importance of Experimenting
It’s worth stressing again how important it is to experiment with the ideas discussed in this series of articles. You need to understand how and why your robot (with its motors, configurations, sensors, etc.) responds to as many situations as possible before you actually try to make it do something like walking.
A Practical Application
In the next issue of SERVO, the final installment of this series will demonstrate how the principles we’ve explored can be used to make the robot in Figure 1 walk forward and maintain its balance — regardless of whether the robot is moving over level ground or up or down a gentle slope.
Don’t minimize the complexity of this undertaking. Hobby-oriented robots using frame-based animation generally have no chance of accomplishing this task.
In preparation for what’s to come, let’s examine how the robot can use some of the balancing principles just discussed to help it determine the slope of the ground in its environment.
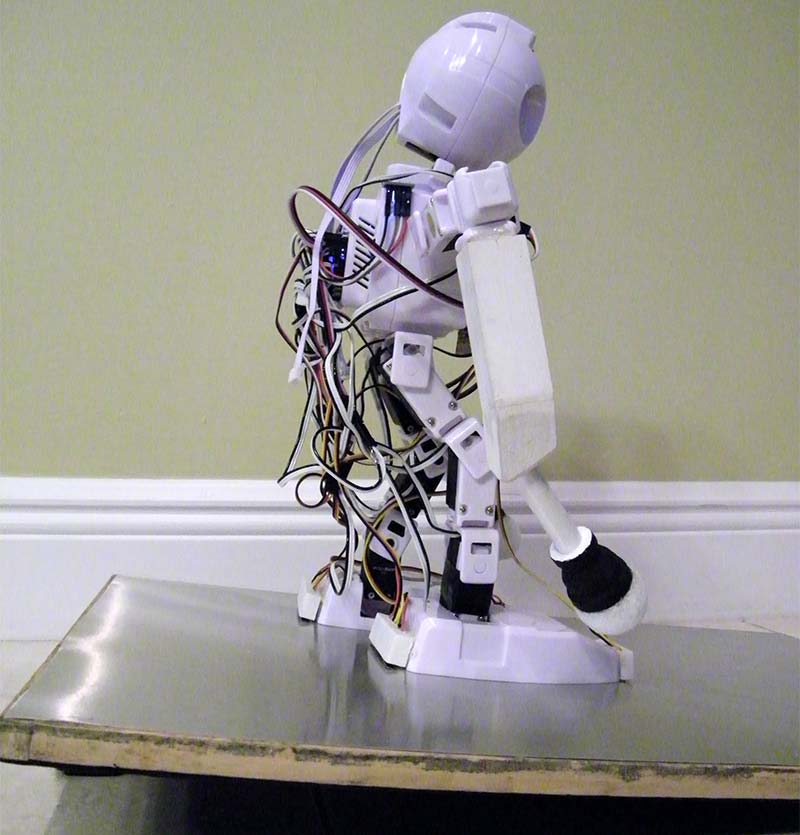
To keep things simple, the robot will only have to contend with a forward and backward slope as shown in Figure 7. Notice the robot is standing on a board that can be raised or lowered at either end to create a desired slope (the left end is raised in the figure).

FIGURE 7.
Our goal is for the robot to use its ankles to constantly lean forward and backward to maintain a vertical orientation as one end of the board is raised or lowered. During this procedure, the robot should also utilize its arms to assist with the balancing.
We want this process to continue until a mouse button is pressed. This allows the user to slowly adjust the board’s tilt to a desired level before clicking the mouse to continue.
Figure 8 show a subroutine that performs these actions.
sub FindBalance(&Slope)
gosub InitServoNames
// obtains F/R balance for manual setup
// slowly raise or lower the board as robot finds its footing
// press mouse button to proceed
repeat
delay 200
call GetTilt(TiltX,TiltY)
if TiltY > 100 // leaning forward
call Lean(BCK,1)//TiltY-DesiredTilt)
elseif TiltY<100 // leaning back
call Lean(FWD,1)//DesiredTilt-TiltY)
endif
Slope = CTR[Lankle]-CUR[Lankle]
print CUR[Lankle];CTR[Lankle];Slope;” “
ReadMouse mx,my,mb
call BalanceWithArms(100,100)
until mb
return
FIGURE 8.
A loop continues to perform the balancing action introduced in Figure 6 until any mouse button is pressed.
Notice also that the routine of Figure 5 is constantly called inside the loop. When this routine is executed, the robot will constantly lean forward and backward while moving its arms as you raise and lower either end of the board.
Notice that this routine also determines how much slope the board (or floor) currently has. It does this by comparing the robot’s current ankle angle to its centered (normal) angle. The main program keeps all of the centered and current joint angles in the arrays CTR[ ] and CUR[ ].
The idea is really simple. If the robot must move its ankle five degrees in order to obtain a vertical orientation, then the floor must be sloped five degrees. When the routine terminates, the floor slope is returned to the calling routine.
In the next issue of SERVO, we’ll see how the robot can use this information to make appropriate adjustments when walking up and down a small slope.
Applying the Knowledge
Remember, most hobby-based walking robots move using a series of frame-based positions. This means that generally they can’t cope with even slight inclines. Now that this series has explored how to move and balance a robot in various situations with minimal side effects, we are ready to see how these principles can be applied to the real world problem of walking up and down moderate slopes.
In the next installment, we’ll see if the robot in Figure 1 is up to the task. SV
Article Comments