Controlling Robots Over the Internet
By John Blankenship View In Digital Edition
Internet communication is much easier than you might imagine, and once you know how, controlling a robot from a remote location requires little effort.
If you visit any electronics store these days, you’ll find more and more devices being controlled over the Internet. If you have ever wanted to experiment with controlling a robot in this way, this article is for you. Before we get into the details of over-the-web control, let’s explore the basic principles of Internet communication.
TCP and UDP
The two primary ways to communicate over the Internet are TCP (Transmission Control Protocol) and UDP (User Datagram Protocol). UDP is the less complex of the two because it’s not a connection-oriented protocol.
A UDP socket can send to any other UDP socket without establishing a link first. There is no exclusive or maintained connection between the two communicating machines.
TCP is a more sophisticated standard for moving data over a network, and is a client-server protocol. A server socket can accept connections from multiple client sockets, but a client socket can only be connected to one server socket at a time.
Once a client connects to a server, it becomes as if there is a direct wire between them, and data can be exchanged between the two sockets. This article will concentrate on TCP communication because — in my experience — it is more widely used by third-party devices.
IP Addresses, Ports, and Sockets
To establish a link between two computers on an LAN or the Internet, you generally need the IP address of each computer. Each address is a set of four numbers separated by a dot (e.g., 192.168.0.120). However, the whole address is not a number; rather it is text.
Each individual number in the four fields ranges from 0 to 255. If you have several computers in your home all connected to your LAN (with cables or wireless), then each will have its own IP address.
Each computer can further subdivide its address by specifying a port number, which can range from 1 to 65535. A socket can be thought of as a program communicating from a particular IP and port. It’s one endpoint of a bidirectional communication over the Internet.
Hardware and Software
Many computer languages offer TCP functions to facilitate Internet communications. If your language runs on a complex computer (such as a Window’s PC), it will have the capability to connect to your LAN. If one of your devices is a microcontroller though, you may need to purchase additional hardware to enable the LAN connection.
RobotBASIC (available free from www.RobotBASIC.org) has functions for both TCP and UDP communication and will be used here for the example programs. The principles shown are universal though, so applying them to other languages should be straightforward.
Setting Up the Server
As mentioned earlier, TCP is a client-server protocol. The server must be running before any client tries to initiate communication, so let’s start by looking at a very simple server program (Figure 1).
print “Server’s IP: “,TCP_localIP()
localPort = 42001
print “Server’s Port: “,localPort
tcps_Serve(localPort)
delay 1000
print tcps_Status() // should be listening
print
print “Enter the server’s IP and Port into”
print “the client program, then run it.”
print
// wait for message and send back GOT IT
while true
rBuff = tcps_Read()
if Length(rBuff)>0
print rBuff
tcps_Send(“Got It”)
delay 100
endif
wend
FIGURE 1.
The program starts by using an internal function to print the server’s local IP address. It also displays the port number used (it must be a port not being used by any other program or computer on your LAN). The program then initializes the server. Note that only the port number is required for initialization because the IP address of the computer will automatically be used.
After a short pause, the status of the server is printed. If everything went well, the status should be listening.
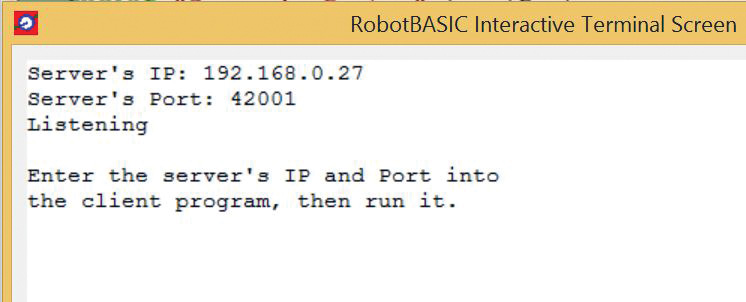
The server program then tells the user to enter the server’s IP and port number into the client program before running it. These actions are shown in the screenshot in Figure 2.

FIGURE 2.
The program then enters an endless loop that waits for messages to come from a client.
When one arrives, it is displayed and the message “Got It” is sent back to the client socket. As you can see, setting up a simple server is really easy if your chosen language has the necessary functions.
Setting Up the Client
Setting up the client program is almost as easy as shown by the program in Figure 3.
Main:
// Enter the Server’s IP and port below
rmtIP = “192.168.0.27”
rmtPort = 42001
gosub ConnectToServer
end
ConnectToServer:
n = tcpc_connect(rmtIP,rmtPort)
// wait for connect or error
t = timer()
while timer()-t < 5000
Status = tcpc_Status()
if left(Status,9) == “Connected” then break
if left(Status,5) == “Error” then break
wend
if left(Status,9) = “Connected”
print “Connected”
gosub CommunicateWithServer
else
print “No server found”\end
endif
return
CommunicateWithServer:
InlineInputMode on
while true
// let user enter text to be sent
input “Enter message to be sent: “, sBuff
n = tcpc_Send(sBuff)
// wait for a reply and print it
repeat
x = tcpc_read() //clear buff
until Length(x)>0
print x
wend
return
FIGURE 3.
The Main program establishes the values for the remote IP and port numbers (the address of the server). A subroutine is then called to connect with the server.
Connecting to the server is handled by an internal function that requires the IP and port number being used by the server. In this example, the client waits for a maximum of 5,000 µs until an error or connection occurs. If connected, another subroutine will be called to handle the actual communication.
The CommunicateWithServer routine handles everything once the connection has been made. In this simple example, the subroutine lets the user enter the text for the message to be sent to the server. After sending the text, it waits for a reply and displays it. An endless loop maintains this process.
Different Computers
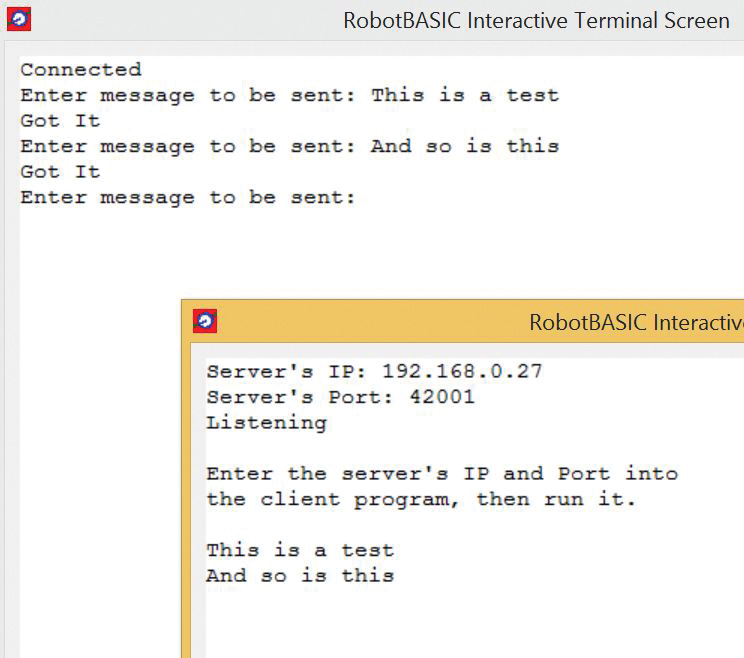
Normally, the client and server should run on different computers. For the moment, we are assuming both computers are on the same LAN, but more on that shortly. If you don’t have two computers available, you can start two instances of RobotBASIC on the same computer and run the server on one instance and the client on the other.
Figure 4 shows how the communication proceeds when both programs are running on the same computer. The smaller window segment is the server. Notice that the messages typed into the client appear on the server’s screen and the message Got It is received and displayed by the client.

FIGURE 4.
Communicating Outside the LAN
The two programs discussed work fine if both computers are on the same LAN (both connected to the same router). If the two computers are on different LANs, the process is slightly more complicated.
Inside your LAN, it’s easy to use each computer’s IP and port to establish the communication. If the two computers are on different LANs though, you need to use the IP address of the router controlling each LAN.
Actually, you only need the IP address of the server’s router because the client’s IP address is automatically embedded into the messages it sends. This lets the server respond properly without you having to deal with the actual address.
The server program doesn’t have any way of determining the address of your router, so you must handle that manually. One easy way of doing that is to use the webpage www.WhatIsMyIP.com.
When you access that page, you’ll see several pieces of information. The only one you need is the IP address labeled IPv4. It’s the address of the router to which your computer is attached. This is the address you should type into the client program (not the local IP for the server’s computer).
More Complications
Unfortunately, you can’t just communicate with the server’s router because the port number being used is associated with a particular computer on the LAN — not the router. Fortunately, routers have a way of forwarding messages received to the computer using the specified port (which explains why no two computers on an LAN can use the same port number). To set up PORT FORWARDING, you have to log into your router. This sounds a lot more complicated than it actually is.
If you don’t have your router’s manual available, typically you can get its IP address (and its default user name and password) by looking it up on the Internet (just search for your router’s manufacturer and model number). Type in the IP address on your browser, log in, and navigate the menus to find PORT FORWARDING.
The actual procedure for setting up PORT FORWARDING is different for different routers, but usually it is straightforward. All you do is enter the port you want to forward to (42001 in this example) and the local IP of the machine you are using for the server program. The router will do the rest. Essentially, if the router gets a message addressed to a particular port on your LAN, it forwards that message to that port on the machine whose local IP you specified when you set up PORT FORWARDING.
Generally, you only need to perform this setup once, but in some cases, the IP addresses of various machines on your LAN can change. Just know that it can happen, so set things up again if your communication fails sometime in the future.
Once you have PORT FORWARDING set up, just enter the server’s IPv4 address and port number into the client program (Figure 4), and you’ll be able to exchange messages between any two computers in the world. With the tests I performed with a friend in Australia (can’t get much farther away than that), the speed seemed instantaneous for manually typed messages.
Controlling a Robot
Once you can receive messages from a remote computer, it’s easy to parse the text for reserved words or phrases like MOVE FORWARD or TURN LEFT and execute the appropriate actions to make your robot perform as expected. Such actions might require controlling your robot’s motors directly or by sending Bluetooth commands to your robot’s microcontroller. Obviously, your robot’s hardware configuration will dictate the exact procedure needed.
What’s Next
Next time, we’ll build on this ability to communicate over the Internet and demonstrate how we can control a robot with voice commands to Amazon’s Alexa (Echo). If you’re familiar with Alexa, you know Amazon’s voice recognition technology is amazing.
With two or three devices in a home, you can usually give voice commands from anywhere in the house. The next article will show how to use Alexa as a speech-to-text system that can send messages directly to a server program (as discussed in this article).
For now, imagine the power of being able to control a robot that way because next time, we’ll make it a reality. SV
Article Comments