Servo Magazine ( January 2017 )
NOMAD: The Evolution of an Autonomous Robot
By Jeff Cicolani View In Digital Edition
This is an update to my March 2015 review of the Nomad chassis kit from ServoCity. The project is on-going, and I've learned a lot along the way. As usual, I got myself in way over my head. Fortunately, through persistence and a little help from time to time, I've made some real progress. I really have enjoyed working with this kit and modifying it with other parts from the Actobotics® line. At the end of my initial review, I declared it a very robust chassis that would be great for use in Magellan competitions.
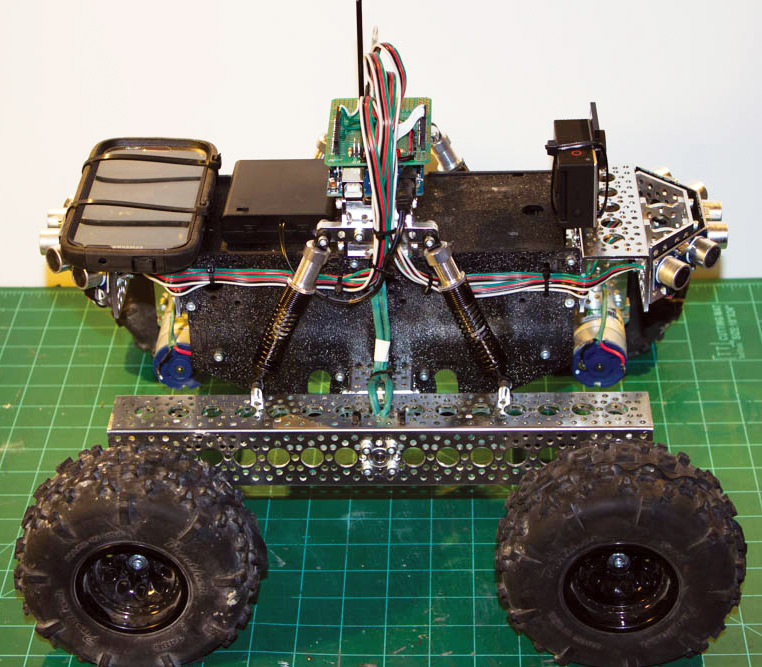
When last we saw Nomad, it looked like this.
The original plan was to use an old Android phone as the main processor, interfaced with an Arduino to collect sensor data and communicate with the motor controller. In the end, I decided not to use the phone. I had started to read about the Robot Operating System (ROS): a middleware package for controlling robots. What enticed me about ROS was the fact that it is open source, used by researchers and companies around the world, and a lot — if not all — of the functionality I wanted to use was already written.
In fact, it was already written by people a lot smarter and with a lot more experience than I have. Whereas there are builds of ROS for Android, at the time they were rather unstable and seeing as the learning curve was already pretty steep, I decided to find a more suitable platform for what I was now calling the Nomad Project.
Intel Edison
Fast forward a few months when a friend from The Robot Group in Austin, TX was divesting himself of parts he’d been collecting. Among them was an Intel Edison with the Arduino compatible breakout board. I had heard some great things about the Edison board; it was pretty fast, ran on Linux, and it had that Arduino compatible breakout board. It was a perfect candidate for this project. Or, so I thought.
My goal was to get ROS installed on the Edison board and load a simple program that would allow me to control Nomad with a wireless game controller. I had developed the program for another platform I put together as a test/learning system called BARB (Big Autonomous Robotic Base). BARB was a 24” diameter circular robot built on a Power Wheels® drive train. It uses a laptop as its controller which allowed me to develop the test program that I wanted to port to Nomad.
To accommodate the addition of the Edison, I had to reconfigure Nomad. The battery came out of the box to make room for the electronics. With the battery out, I could lay the Roboclaw motor controller flat as opposed to mounted on the side. I created a system of plates for mounting the electronics using acrylic cut on the laser cutter at ATX Hackerspace and offsets. This allows me to remove the electronics as one unit. I often refer to this as the “stack.” I replaced the 12V SLA brick with an 11.4V 3s LiPo battery pack that I could mount in the aluminum channel from the kit.
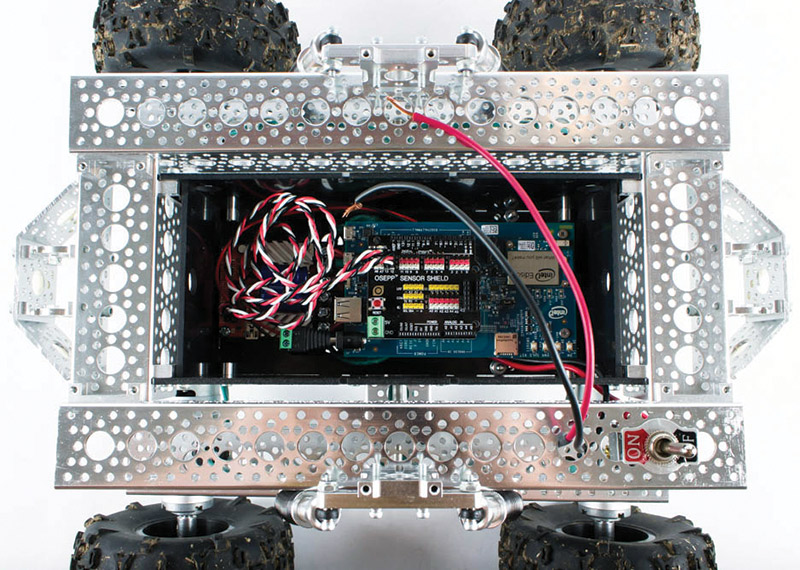
Nomad with the Intel Edison board and sensor shield.
The Edison runs on a version of Linux called Yocto, which I had never heard of before. ROS, however, is built to operate with Ubuntu and other Debian derivatives. There was not an install path for Yocto Linux. However, there was some success using UbiLinux which is, supposedly, a light version of Ubuntu. So, I installed UbiLinux on the Edison and then ROS applying the same build instructions used for the Raspberry Pi. The installation was successful and I had ROS running.
However, when I went to install the test program, I could not get the gamepad to work. It turns out the joystick drivers are not in UbiLinux. On top of that, the package needed to install the drivers was not part of UbiLinux. With no community support for that application and after spending two weeks looking for answers that simply didn’t exist, I abandoned the Edison board.
Raspberry Pi
What did have a strong and growing community was the Raspberry Pi. I happened to have a couple of model B+s on hand. I knew I could get the test code to run on the Pi since I had just done it on a project for some film makers in San Antonio.
To simplify the I/O with the sensors, etc., I decided to also include an Arduino Mega. There were several reasons for this, not the least of which was the separation of signal processing from the main program. I would be able to manage the sensors on the Arduino and just send the consolidated information as a serial stream to the Pis. With this, the stack took on a new form with the Roboclaw on the bottom, followed by two Pis, and the Arduino with a sensor shield on top. It was also at this point I decided to add an Xbox Kinect for vision.
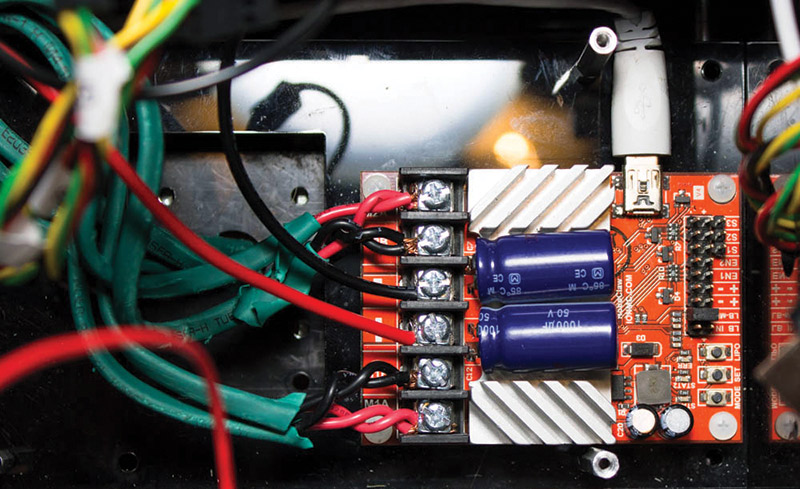
Roboclaw at the bottom of the "stack.”
At some point, I was further inspired by Actobotics’ Mantis platform. In particular, I was enamored by the independent suspension which, of course, Nomad had to have. So, I spoke to the good folks at ServoCity and soon received the parts for the conversion.
The idea behind the two Raspberry Pis was to — again — split the processing. Vision processing is intensive, as is navigation. With two boards, I could dedicate one to processing the input from the Kinect and the other to navigation, or as I learned during this process, SLAM (Simultaneous Localization And Mapping).
ROS installed nicely and I was able to get the test program running without a hitch. At that point, I started adding the sensors. Using a package for ROS called ROSSerial, I was able to read the PING))) sensors through the Arduino. These were configured to act as a bumper to avoid any obstacles the Kinect may have missed. The Kinect itself, however, proved a bigger challenge. I could simply not get the drivers to work. Others had great success with this, but at the time I was not one of them.
Enter Nvidia
By now, I was a year into the project. I was trying to get the Kinect working right up to the next big show for The Robot Group: South by Southwest (SXSW). For those of you who aren’t familiar with SXSW, it is a large festival in Austin, broken into three parts: interactive, film, and music. Interactive is all about new technologies. As part of Interactive, there is a show called Create which is free and open to the public. The Robot Group had a sizable display there that year, and I really wanted to be able to show off Nomad with working sensors and collecting vision information from the Kinect. Alas, it was not to be.
However, directly across from our booth was one for Nvidia: the makers of video cards. Nvidia has an embedded system called the Jetson and they had just come out with their newest version: the TX1. The Jetson TX1 runs their latest Tegra processor which consists of a 64-bit quad core ARM processor and 256 Cuda GPU cores. This setup allows for massive parallel processing. In short, this little board is a video processing powerhouse.
In their booth, they were demonstrating how their Jetson TX1 could be incorporated into a robot with a stereo camera system to perform SLAM activities. To take it a step further — thanks to the Cuda cores — they were able to build a neural network on the robot so it would learn as it went. My amateur hobby robotics mind was blown. This was one of those, “stop talking and take my money” moments. The engineer that was there gave me his contact information should I have any questions and directed me to their embedded developer page.
Two weeks later, my Jetson TX1 Evaluation Kit arrived in the mail.
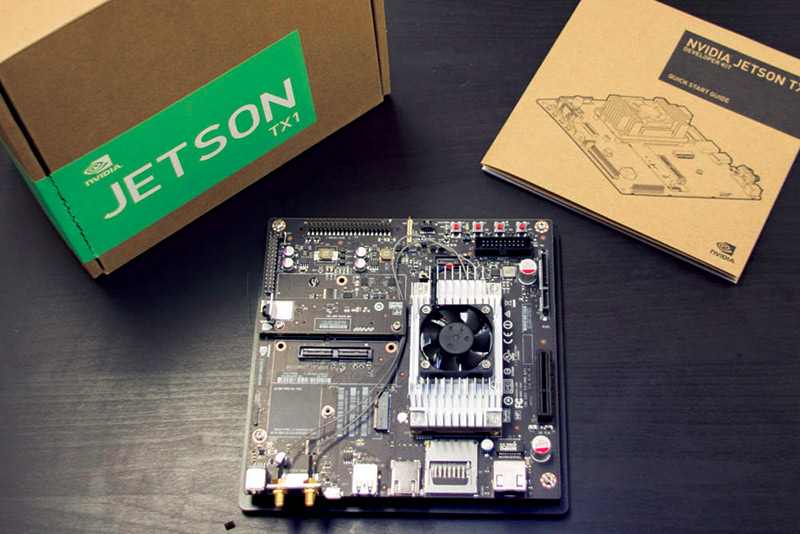
Nvidia Jetson TX1 unboxing.
A week after that, the Zed stereo camera system from StereoLabs was on my porch. The evaluation kit is significantly larger than the Raspberry Pi, which meant yet another reconfiguring of the chassis. This time, I had to build a larger box in which to house the Jetson and associated electronics. While I was at it, I added dedicated space for the power switch, an external Ethernet port, power jack, HDMI port, and two cooling fans. For the Zed camera, I also ordered a nice pan/tilt assembly from ServoCity.
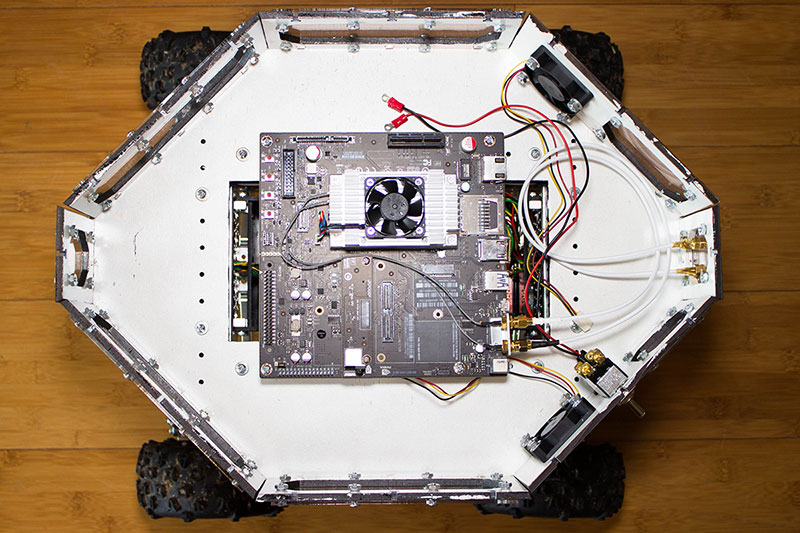
New larger box.
At this point, I have to say how thankful I am to have found the local hacker space here in Austin. This place has been an amazing resource for building Nomad and so many other projects. Between the laser cutters, 3D printers, and all of the other tools available here, there is very little that can’t be done. We’re even adding a CNC plasma cutter. So, once the design is finalized, I might even cut a new chassis altogether out of aluminum. And it’s not just the tools. The people and talent is fantastic.
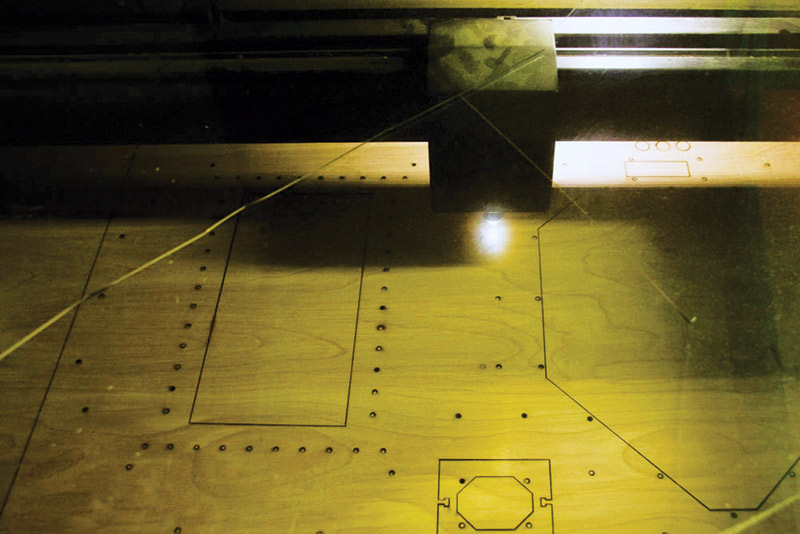
Cutting the new box on the laser.
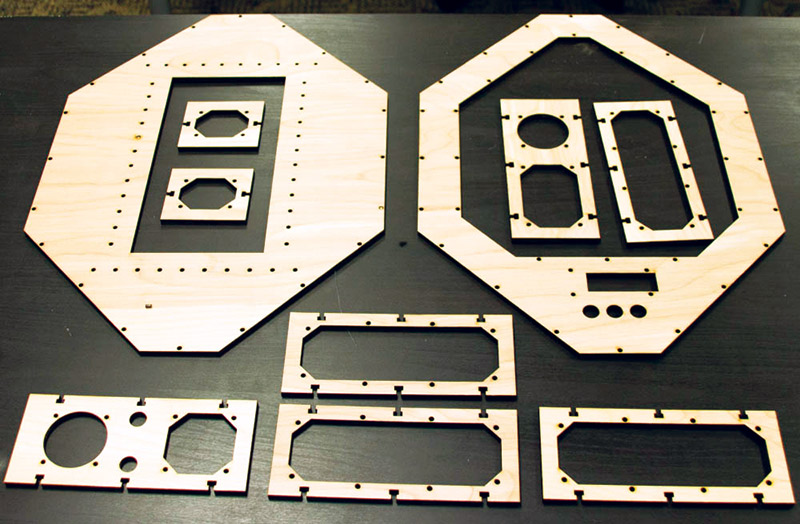
Nomad’s new box, fresh off the laser cutter.
Without some of the expertise from the ATX Hackerspace, I don’t know that Nomad would have made it anywhere near as far as it has. If you haven’t already availed yourself of your local maker or hacker space, do so. You will be astounded at what you can get done.
Prepping the Jetson
With the majority of the physical build done (because, let’s face it, you’re never really 100% done with any part of a project like this), it was time to get the OS and software started. Nvidia provides a pre-assembled package of OS, drivers, and software called Jetpack. This package is optimized by the engineers and developers for this board. The installation for someone new to this process is not necessarily a straightforward one. There were some obstacles I had to work around that weren’t obvious. Hopefully, my experiences will help you avoid some of the same hurdles. These issues started right at the beginning ...
Initial Hardware Problems
Right at the beginning, I was having challenges in just seeing what was happening. When I received my TX1, it wasn’t blank. There was an initial OS installed. I didn’t play around with it enough to see if a version of Jetpack was already Flashed. I wanted to get it updated quickly to make sure it had all of the proper drivers. So, I tried to connect the board to a spare monitor I had lying about. The monitor did not have an HDMI input which is needed for connecting to the Jetson. Using an HDMI to DVI adapter, I connected the monitor to the TX1 with no results.
It turns out the HDMI out from the Jetson is not compatible with converters — at least not natively. So, next I tried connecting it to a television with an HDMI input. This time, I was able to get video, but it was cropped around all the edges significantly. I was unable to see the first five or six characters of the text that was streaming during bootup.
The issues with the converter and the television led to my first unexpected expense: a new monitor with HDMI input. Fortunately, Fry’s had one on sale. It was a little larger than I was hoping for, but it was less than $100, so I went ahead and bought it. While I was there, I went ahead and picked up a USB3 hub knowing I would need it for use with the Zed camera later. With the new monitor, I was able to see the output properly.
While on the topic of hardware issues, there is also the matter of the keyboard/mouse. This is probably not related to the actual install since it was not an issue with the re-Flash (more on that later). The Logitech wireless keyboard/touchpad did not initially work with the board. I had to use a wired mouse and keyboard through the aforementioned USB hub. So, something to keep in mind.
Installing Jetpack
Jetpack is not installed directly onto the Jetson board. It is actually installed through another host machine onto the TX1. To install Jetpack, you will need to do so from a full independent installation of Ubuntu 14.04. And by independent I mean you can’t install it from a VM (virtual machine). It has to be an actual machine. I spent several hours trying to get it to run within a VM, including installing Virtualbox on my Windows 10 machine but, in the end, it was nothing but frustration.
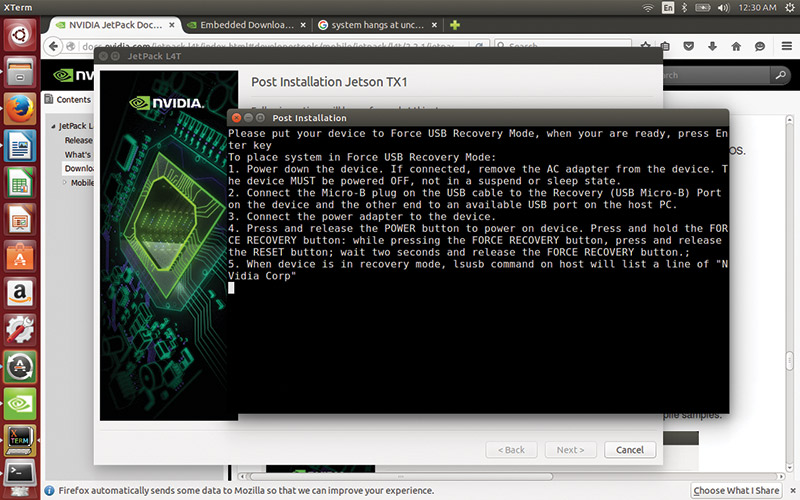
Installing the Jetson Jetpack.
So, next I turned to my laptop running Ubuntu 12.04. There I had many of the same frustrations. I just could not get the installer to run. I put a fresh install of Ubuntu 14.04 onto the machine and had the same issue. It turns out the problem was me and my very poor understanding of Linux. In order to run the Jetpack installer, you have to precede the filename with a dot-slash ( ./ ) in the execute line.
I am not going to go over the whole installation process here since it is well covered on several websites. The instructions I used are available at the URL listed below. However, there are some things you will need to know going into it:
- You will need a developer account to download the package. These are free. Nvidia just wants to know who is accessing their files.
- The Jetpack is not installed directly on the Jetson board. You will instead be installing the Jetpack on a host Ubuntu Linux 14.04 host system. In my case, I was using a laptop which I have set aside specifically for my robotics experiments and development.
- As stated above, you cannot install Jetpack from a VM. For you Windows users, it’s a bit of a pain, but if you’re going to be playing around in this more advanced robotics space, you’re going to have to learn Linux anyway. Bite the bullet, get a cheap refurbished laptop, and install Ubuntu on it.
- Be sure you are connecting both the host system and the Jetson board via Ethernet cable to the same router/network. Jetson installation will fail if you try to use Wi-Fi.
- Make sure the version of Jetpack is compatible with your chosen hardware. You’re going to find — at least at the time of this writing — the newest bleeding-edge version may not have the driver and software support you need. I ended up having to roll back from JetPack 2.2 for L4T to JetPack 2.1 for L4T because 64-bit support just wasn’t where it needed to be. The latest version may have fixed this, but at the time it was an issue.
During the setup, I ran into an issue where the host system could not find the Jetson on the network. Jetpack installation is a multi-stage process. Once it has Ubuntu installed, it will restart the board and attempt to connect to it via Ethernet. For some reason, on my first pass, the host failed to capture the IP for the Jetson. If this happens to you, reset the Jetson and boot it into the GUI. The user is “ubuntu” and the password is “ubuntu” by default. Once in, connect to your router as normal, then use:
~$: sudo ifconfig
to find your IP address. Back on the host machine, run the installation again. It will skip everything that was done and take you to the point it tried to connect to the Jetson.
When the system fails to find the IP address, select to manually set it. This will bring up a new dialog box where you enter the target’s IP, user, and password. It may take a couple minutes to connect, so let it do what it’s going to do. Once it finds it, the installation will continue.
Now, with all my warnings and life lessons out of the way, follow directions at http://docs.nvidia.com/jetpack-l4t/index.html#developertools/mobile/jetpack/l4t/2.2.1/jetpack_l4t_install.htm.
Installing ROS
The next step in the process for Nomad is the installation of ROS. This installation is probably the most straightforward of any of them simply because you’re installing onto a full version of Ubuntu. Because the version of Ubuntu in this selected version of Jetpack is 14.04, I needed to install ROS Indigo. Like any other ROS install, make sure you match the version of ROS to your version of Linux. Each version is optimized to the most recent stable version of Ubuntu at the time it was released. Mismatching the versions will cause countless issues that can otherwise be avoided.
The Jetson platforms use ARM processors; therefore, you’ll need to install the appropriate version of ROS for ARM. The official instructions for doing so can be found on the official ROS.org wiki at http://wiki.ros.org/indigo/Installation/UbuntuARM. Again, I’m not going to list out all of the instructions here.
Finally, I was in a position to load the test program I wrote so long ago for BARB and the earlier iteration of Nomad. The nice thing about getting familiar with and using ROS is how little code it actually takes to make something happen. All of this source code is available on GitHub at:
- https://github.com/jcicolani/Nomad/blob/master/src/nomad/nomad_control.py
- https://github.com/jcicolani/Nomad/blob/master/src/nomad/nomad_drive.py
- https://github.com/jcicolani/Nomad/blob/master/src/nomad/roboclaw.py
These are the pieces of custom code and the modified sample file from ION Motion Control that I'm using as a driver.
There are four modules needed to get Nomad driving, three of which are in the Git repository: roboclaw.py, nomad_control.py, and nomad_drive.py. The first is the custom driver script for the Roboclaw from the sample Python program provided by ION Motion Control: the makers of the Roboclaw motor controller. The second file (nomad_control.py) subscribes to the JoyCommand message of the Joy node and publishes the axes signals as a Twist message — which is the standard movement message used in ROS.
Lastly, nomad_drive.py is the node that interacts with the motor controller. It leverages the Roboclaw driver to send movement commands as well as read pertinent information provided by the driver, such as battery voltages, operating temperature, and any errors generated by the motor controller.
The fourth module is the standard joystick package. To get the joystick package installed for ROS, I followed the instructions at http://wiki.ros.org/joy/Tutorials/ConfiguringALinuxJoystick.
To get Nomad moving, I have to start up each of these nodes. Generally, you would put each node call into an ROS launch file and simply use roslaunch to start all of them at the same time. However, at the time of this writing, I have been experiencing some issues with nomad_drive.py starting up properly. While I diagnose the issue, I am starting each of the nodes separately. Each node has to be started in its own terminal window on the Jetson board, starting with the core processes:
~$: roscore
~$: rosrun joy joy_node
~$: rosrun nomad nomad_control.py
~$: rosrun nomad nomad_drive.py
The night I got Nomad configured, loaded, and running was our Robot Group meeting at ATX Hackerspace. I cannot express how good it felt to have Nomad driving around the classroom and shop there. Two years of build, rebuild, and rebuild again, and Nomad was alive and moving.
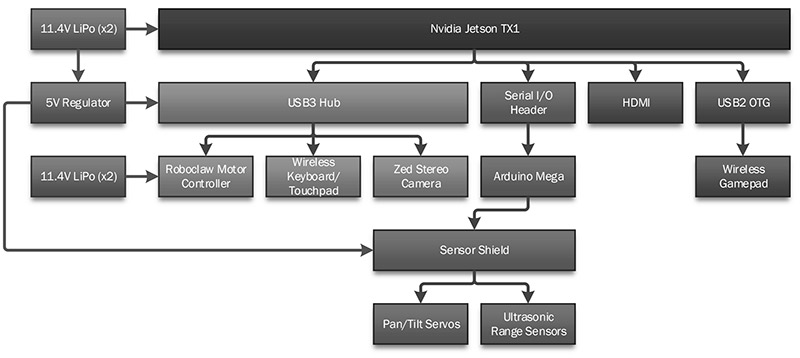
Nomad systems block diagram.
Current State
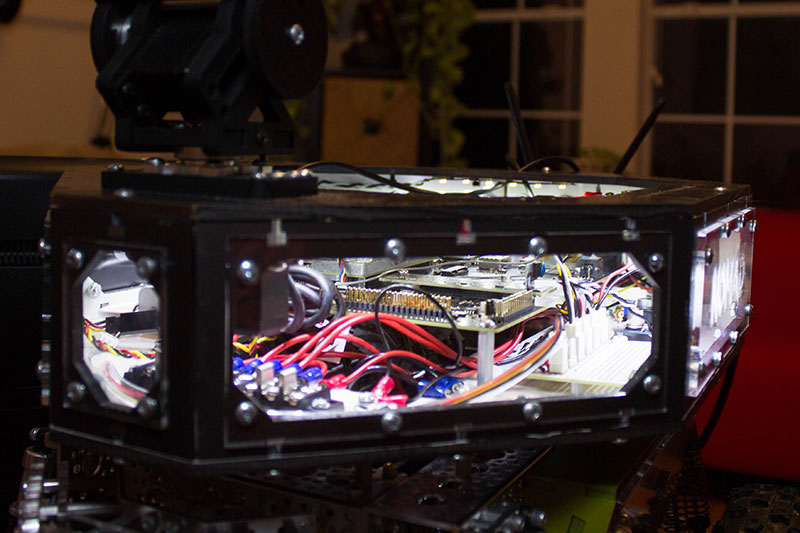
Of course, like any project, once you have it working is when you start to find other issues. Right from the beginning, there were three issues that had to be addressed. The first was a physical issue; the wheels I was using were those from the original Nomad kit. These weren’t intended to support the 16 lb Nomad now weighed. The other two were electrical: There was too much pressure on the USB connector to the Roboclaw, and I had an intermittent power problem going to the Jetson board. Both of these issues resulted in the motor controller losing signal with the main board.
Without changing the profile of Nomad, I essentially have two solutions to the wheel problem. The first is to replace them with air filled rather than the standard foam filled tires. The other is to simply remove the foam insert and fill tires with expanding construction foam. Obviously, I went with the more eloquent and complicated air filled solution. I ordered bead lock hubs and air fill valves used in volleyballs.
The USB connection was an easy fix. I simply replaced the cable I was using with one that has a smaller plug end. The plug is no longer pressing against the side wall of the box and the pressure is released. The electrical problem is still plaguing me, however.
My initial thought was the barrel plug assembly was interfering with other components and was being knocked loose. The solution for this was simply moving things around a little bit. The offending component was the main power switch attached to one of the rear panels. Fortunately, I designed the panels to be flipped. So, the power switch is now on the other side of the box and there is no more interference with the barrel jack.
In the end, I have a pretty substantial hardware stack. At the root of everything is the Jetson TX1 board. Directly attached to that is the HDMI port, USB2 OTG cable, USB3 hub, and Ethernet, wireless, and Bluetooth connectivity. I may also add an SATA SSD for extra storage, though I could do the same thing with an SD card. The USB3 hub is connected to the Roboclaw, Zed camera system, and the Logitech wireless keyboard and mouse. The USB2 OTG cable terminates in the dongle for the Logitech wireless gamepad. I discovered in a past project you cannot power your Arduino through an external source while connected to USB. So, the Arduino is connected to the Jetson board via the I/O pins on the Jetson.
Power is supplied to Nomad using four 11.4V LiPo battery packs. These are broken into two banks: one for the motors and the other for all of the electronics. A 5V DC regulator is supplying extra power to the USB3 hub, and a second one supplies 6V to the Arduino’s sensor shield. Both circuits can be powered by an external power supply when Nomad is on the bench.
Next Steps
One of the issues that needs to be addressed is the power control. Allowing Nomad to go careening off out of control when there’s an interruption in communication between the main board and the motor controller is unacceptable.
In order to address this, I am building a power control and watchdog system using an Arduino Uno and a couple relay boards. The main switch will become a power selector, allowing me to choose to power Nomad by the onboard battery packs or through an external power supply. A second smaller switch will control the power to the Arduino Uno board. The Uno — when powered up — will systematically turn on each of the systems in Nomad — the last of which will be the Roboclaw.
Once power is applied to the main board, the Arduino Mega will be powered up and it will begin sending a signal to the Uno via connected pins. The pins will need to share a ground and will have a protective resistor on the jumper between them for protection. Once the Uno begins receiving this signal, it will turn on the motor controller. As long as the Uno receives the signal, the motor controller will remain powered. If serial connection is lost between the Mega and the main board, the signal will be stopped and the motor controller shut down.
While the power control system is being built, other development will also continue. Next, I will be attaching the sensors to make sure I can capture signals from them. Then, I am anxious to get the Zed stereo camera powered and working. I am excited to pull image and point cloud data, and start working with navigation.
To assist in all of this, I am building a base station for Nomad. The base station consists of a laptop outfitted with a wireless hub. The wireless hub runs on five volts and less than one amp, so it can be powered by the laptop’s USB port. The plan is to bind Nomad to the wireless router and then share the Internet connection from the laptop to the hub. In that way, Nomad and the base station will always be connected to the same network and when I’m working off-site, I only have to connect the laptop to local Wi-Fi. It will also allow me to use remote desktop access on Nomad to work without having to set up a separate monitor, keyboard, and mouse.
The base station includes a box to elevate Nomad off the table while on the bench. This will allow me to test the entire system without worrying about the robot driving off the table. A 12V power supply is built into the bench box that can be used to power Nomad on the bench without using the batteries. All of this is contained in custom boxes for transport, protection, and to provide a platform on which to work. There is a separate toolbox. The boxes are stackable on a custom cart to allow for easy transportation.
I’m planning on entering Nomad into the RoboMagellen competition at the next RoboGames. It’s a tight deadline at this point, but an achievable goal. So, with a little luck and a lot of work, the next update will include a performance report from RoboGames! SV
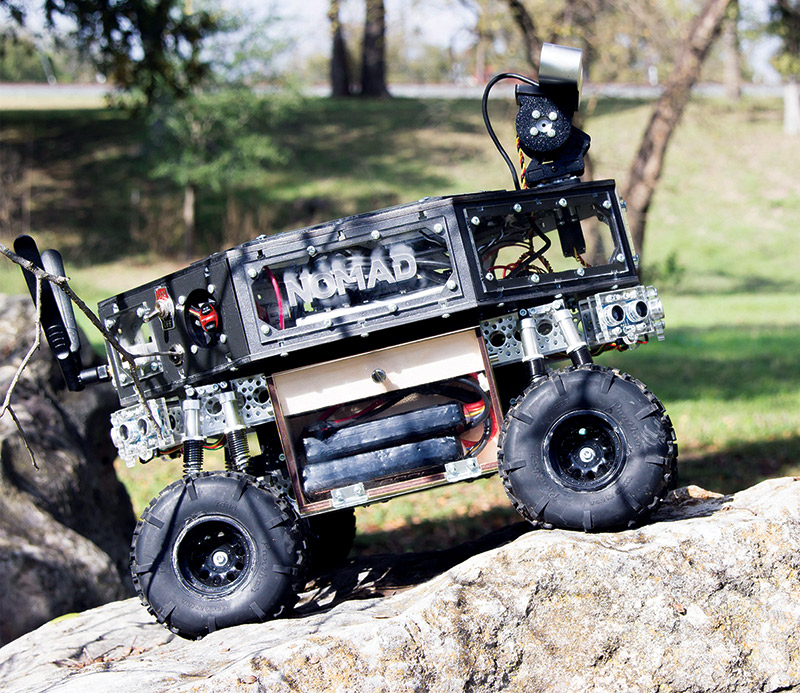
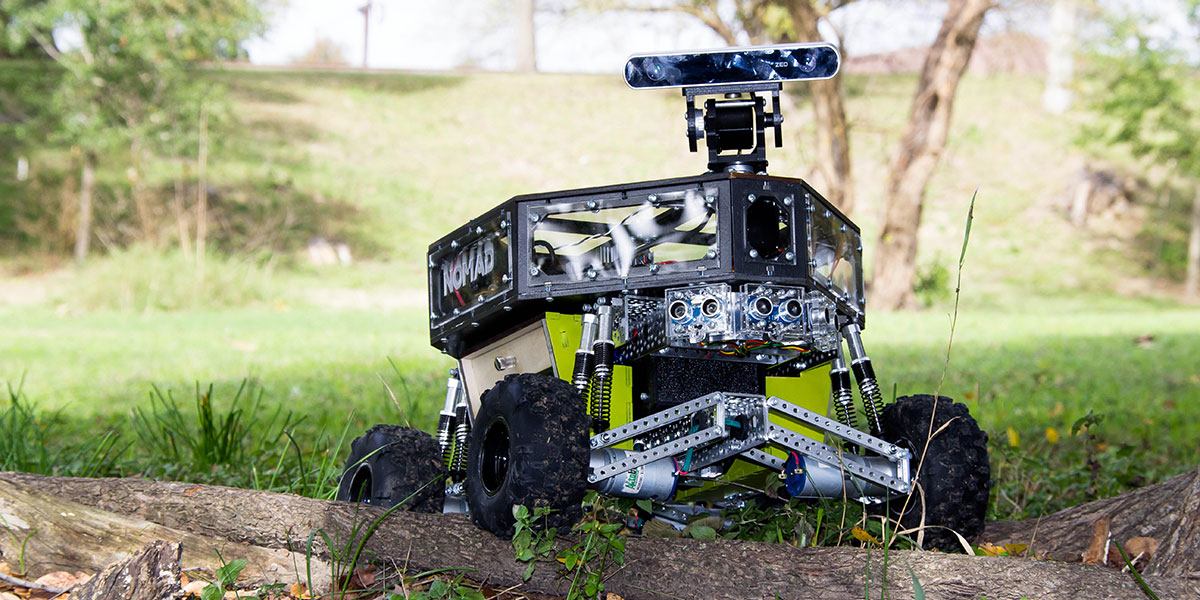
Nomad stands ready to take on the world.
Resources
Nomad's blog:
http://nomadrobot.info
Nomad's source code on GitHub:
https://github.com/jcicolani/Nomad
Nvidia Jetpack installation guide:
http://docs.nvidia.com/jetpack-l4t/index.html#developertools/mobile/jetpack/l4t/2.2.1/jetpack_l4t_install.htm
ROS for Ubuntu on ARM processesors:
http://wiki.ros.org/indigo/Installation/UbuntuARM
ATX Hackerspace:
http://atxhs.org
ION Motion Control:
www.ionmc.com
ServoCity:
www.servocity.com
Article Comments